Saturday, June 23, 2012

Coming in the fall: Classes on Dyeing with Weld and Onion Skins

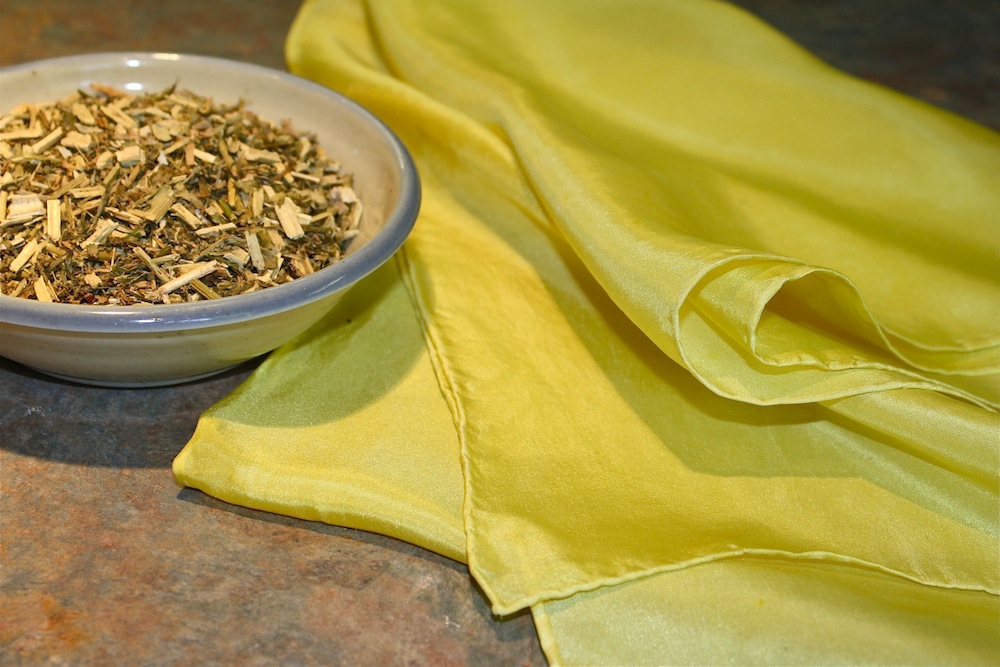
Dried weld (left) and 8mm China silk scarf dyed at approximately 100% weight of goods.

Yarn dyed with good old cooking-onion skins. Note that the yarn was already a pale yellow color, so the resulting color is a deeper gold than if the yarn had been natural.

This fall at the Weaving and Fiber Arts Center, I'll be teaching a class on dyeing with weld, an ancient dye for achieving bright yellow, and onion skins, which yield a golden color. For the upcoming schedule of classes (soon to be posted), please visit the website for the Weavers' Guild of Rochester, which sponsors the Weaving and Fiber Arts Center, at www.weaversguildofrochester.org

Wednesday, May 30, 2012

The Toad


"Sweet are the uses of adversity,
 Which, like the toad, ugly and venomous,
 Wears yet a precious jewel in his head..."

 Shakespeare, As You Like It


Tuesday, May 22, 2012

Scenes from a Dye Class: Madder and Cochineal

Linen scarf, ombre-dyed with madder and cochineal

Today at the Weaving and Fiber Arts Center in East Rochester, NY, four fiber enthusiasts and I spent several hours playing with madder and cochineal, seeing what reds we could achieve with these two ancient dyes.

We had some surprising results! Using cochineal bugs purchased online from Wild Colours in the United Kingdom -- and following their directions -- our fibers came out in vivid purples and lavenders! I bought a 100 gram bag of bugs (sounds nice, doesn't it?), ground them up in my coffee grinder, doused them with boiling water and soaked them overnight, strained them in the morning, and divided up the dye solution between two dye pots. So I used about 50 grams of ground cochineal for maybe 300 to 400 grams of fiber. Here are some results.

Wool yarn on left, cotton on right

In my experience, cochineal produces magenta, rose, and salmon-red colors. How did this happen? Our water is hard -- perhaps that changed the chemistry. I used a high concentration of dye powder, which might have had some effect. Does anyone out there know how we got purple from cochineal, using nothing but alum mordant?

More results below, from both cochineal and madder, with an alum mordant. By the way, I had to increase the intensity of the madder dye, because our results at 10% WOG were lackadaisical. I upped it to 20% WOG (that's dyeing jargon for a ratio of 20 to 100, weight of dye to weight of fiber).

Wool roving dyed in madder, alum mordant

Skeins on drying rack: madder on left, cochineal on right

Different fibers, same vat, different results: Tencel on left, silk on right

Many thanks to Barbara Clements, Eleanor Hartquist, Joyce Leary, and Gretchen Wheelock for a wonderful afternoon!
Friday, May 18, 2012

Indigo-Dyed Tablecloth with Japanese Kanji Saying 'Nourish Body & Soul'


Having a meal with good friends and family, we do nourish both body and soul. That's the message on this indigo-dyed cotton tablecloth, using Japanese kanji -- symbols -- for the words "nourish," "body," and "soul." I created stencils with images from the internet, cutting them out of freezer paper and ironing them in the center (well, off-center) of this cotton twill tablecloth. Using three colors of Shiva oil-based paint sticks -- iridescent blue, copper, and gold -- I dusted the stencils with color and left them to dry.

The fabric was dipped three times in an indigo vat to achieve a true sky blue, as only indigo can do. I'm hoping to sell this on Etsy but, if not, it will definitely work on my patio table. Sitting outside and enjoying dinner on a summer's evening is one of my husband's favorite things to do. We have a garden with lots of Japanese plants and accents. So many of us admire the Japanese way of doing things, myself included. This tablecloth is my "homage"!


Saturday, April 14, 2012

Silk Origami Top, Dyed with Indigo and Quebracho Red


I sewed this top in about two hours, using Origami fold techniques outlined by Marina O'Connor in the March/April 1995 issue of Handwoven magazine ("Six Squares Origami Tops"). Caroline Stanis-Gage introduced the technique to our guild and, aided by my trusty Rowenta iron and Huskylok serger, I was able to make it in a size 8, without any seam allowances. Please remember that this piece does NOT allow for seams, so be sure to take that into account (using a larger piece of fabric, for example, or making a very small garment).

Here's the play-by-play description:

1) Take two China silk scarves measuring 15" wide by 60" long. Dip them in an indigo vat and then over-dye them with Quebracho red -- to achieve the gentle lilac purple that you see in the photo.

2) Sew them together at the ends so that you have one very long scarf.

3) Starting at one end, fold this long scarf into 6 perfect squares (15" x 15"). Use your iron to secure the folds.

4) Cut away the leftover edge of the fabric.

5) Cut a triangle off of the first square on the left, going from the bottom right hand corner to the top left hand corner.

6) Sew that triangle to the far right side of your rectangle, so that the triangle starts at the bottom right hand corner and ends at the top left hand corner.


7) Next, cut the piece in half, by cutting a diagonal line in the center square. Sew the pieces together -- like this:
8) Turn the piece 45 degrees clockwise, so that the squares become diamond shapes. Cut a hole in the center that is approximately 11" wide.

9) Fold the piece in half and wrap the triangles at the sides to form the body and sleeves, like this:


Ingenious, isn't it? I found that a 15" wide scarf makes a small top, so my next piece will be approximately 18" wide. This will make for a roomier, more casual fit -- one that is more accommodating to figures like mine!

This piece is for sale in my Etsy store.


Wednesday, March 28, 2012

And to Think that It Happened with an Indigo Vat!

With apologies to Dr. Seuss...


Well, not JUST an indigo vat. These scarves were dipped (how many times for each, I don't know) in an indigo vat and left to oxidize for several days. Next I immersed them both in a vat of Quebracho red with walnut dye solution added as an afterthought. I was just playing -- who knows how long or how much of each quantity I added!

Finally, I clamped on some circular disks to create a shibori resist and then immersed each scarf in a discharge vat. I used thiox to discharge the color -- which is the same ingredient used in my indigo bath to reduce the oxygen. Hence the unusual colors, because the thiox reactivated the indigo, creating wonderful and definitely unpredictable colors.

If anyone reading this knows more about why this happened, I would love to hear from you! I've had this happen before, where a discharge bath can reactivate the indigo color. I also know that an indigo bath can act as a discharge vat for other colors.

For the circle designs, I sometimes used wooden disks that had some blue acid dye still on them. It makes the circles look like the sun in an eclipse.


Wednesday, March 21, 2012

Sunrise Sunset Coat


This coat was just juried into the fashion show for Convergence 2012, the biennial international conference sponsored by the Handweavers' Guild of America. This year's show and exhibit takes place in July in Long Beach, California.

My entry is titled "Sunrise Sunset Coat," marking the many changes this winter in the lives of the people I love. It's dedicated to my father who turned 88 in January and is now in long-term care at a wonderful nursing home, Penfield Place, in Penfield, New York.

The coat is woven on a warp of 60/2 silk, hand-dyed in two alternating color ways, which you can see in the stripes.


I used two different wefts: one of hand-dyed 60/2 silk (on the right side of the photo above) woven in stripes of 3/1 and 1/3 twill and the other of Habotai silk ribbon and handspun merino (on the left in the photo) dyed a deep burgundy and woven in plain weave. I love the way the warp flows every which way in the plain-weave fabric, which resembles a rag rug.

The pattern is by Issey Miyake, Vogue 1069, now out of print but still available from the Vogue website. It has a wonderful construction that drapes beautifully and flows gently over the body.


Thanks to Timothy Fuss for his artistry in the photos! They definitely show off the coat in its best light. For more on his work, visit http://www.pixel-wave.com/