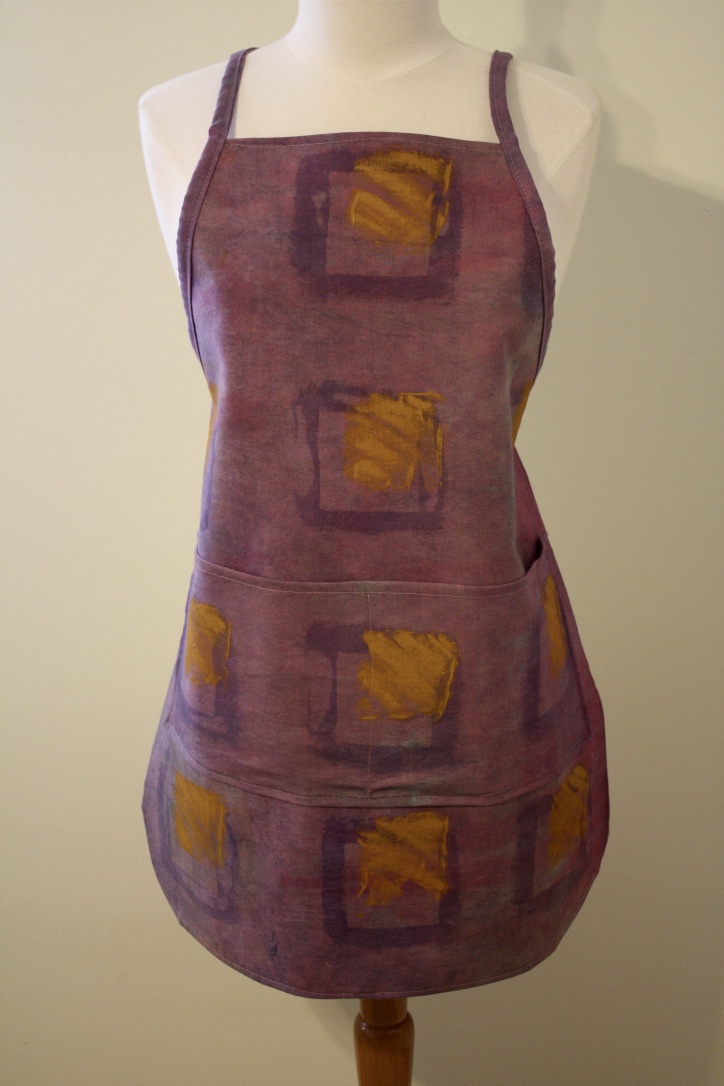

For some reason, I like aprons. They make a statement and they certainly broadcast the fact that somebody's working here! Sort of a colorful costume, in a way. And they're tidy, whatever you're up to.
Anyhow, this being the holiday season and considering that I have a lot of hand-dyed cotton hanging around, making aprons seemed like a good idea. I dug up an old one that I wear a lot, copied the shape, and added a few touches of my own. I liked the results so much that I thought I'd share it.
(One caveat: These instructions don't have as many photos as I like to use, simply because I didn't take photos as I was working. So these instructions are wordier than they probably should be.)
Anyhow, here's what you need.
Gather Your Materials
- 2 yards of hand-dyed or commercially printed cotton muslin or cotton duck or canvas. (I used muslin in a natural color. For the apron above, I dyed the muslin with Pro MX Fiber Reactive Dyes and them embellished it with textile paints and Shiva Paint Sticks. Anything will do, but to me the heavier cotton canvas fabrics are a bit harder to dye, simply because they are stiffer.)
- If you use regular muslin, as I did, you may want to back it with another layer, to give your apron more "beef." I sandwiched both fabric pieces together using "MistyFuse" iron-on stabilizer, available at Joann's or online.
- Pattern-tracing paper
- Thread, scissors, sewing machine, of course
Make the Pattern

Using a sheet of pattern-tracing paper, cut out a rectangle that's 27" long x 22" wide. (Please ignore the blue tape on my pattern. I just happened to piece some odd leftovers together.)
Make curves at the corners on the base of your pattern (the bottom part of the rectangle that is 22" wide), starting 2" above the base of the pattern at each corner. (You see these curves at the bottom and top left corners in the photo.)
For the neck edge and armholes (the right side of the pattern in the photo), trim the pattern this way: Cutting away 6 1/2" from each corner, leave a 9" wide line at the top of the rectangle. Cut away the armholes starting on either side of that 9" wide line and curving down so that the side of the pattern is a full 18 1/2" inches from the base.
(Another way of stating this: Before you cut away the armholes, make a mark on the pattern 8 1/2" down on either side from where the neck will be. Then mark both sides of the neck, starting at 6 1/2" from the corner on both sides. If this doesn't make sense, just email me at dkovn[at]hotmail.com.)
Cut and Prepare the Fabric
As I suggested, a two-layer fabric is preferable if you're using muslin or quilter's cotton. For the first layer, you will want to cut the fabric a full 1" larger all around. (This is so that you can hem it all around.) Cut the MistyFuse (or whatever stabilizer you will use) the same size as the pattern and cut the back piece of fabric the same size as the pattern.
If you're making an apron that is only one layer of fabric, you will still want to cut it 1" larger than the pattern all around.
If you're using two layers, you will want to sandwich them together at this point. I took the top layer (the front of the apron) and placed it face-side down on my ironing board. Then I placed the MistyFuse on top of that, centered so that there was 1" of the top fabric all around it. Finally, I placed the "back" fabric on top of the Misty Fuse and ironed all the pieces together.
Hem Your Apron on All Sides

All I did was iron the edge of the top layer of fabric toward the back of the apron, all around -- first, ironing the hem in half and then turning that half inward and ironing it once again. This avoids any frayed edges. I sewed it about 1/4" from the edge on my sewing machine. (I actually sewed it with the back of the apron facing up, to make sure I caught all the edges of the hem.)
You will have to work your way gently around the curves at the base of the apron, coaxing and folding the fabric in as you sew.
Making Your Apron Strings

As you can see, you will make just one apron string. Starting at the back where it ties, you sew it onto the armhole and then leave a big loop to go over your head. Then you sew it to the other armhole and detach it for the other side of the tie.

Nice idea, eh? You can use store-bought double-folded bias tape for this, if you like. But I wanted to use my original fabric and, since I didn't have quite enough to cut out the ties on the bias, I simply cut out long vertical strips of my fabric.
The dimensions for your apron strings (which I also call "tape"): Cut out enough fabric, sewing the pieces together as needed, to get a length of 120" (shorter if you're short like me) and a width of 2". Fold the piece in half length-wise and iron it, so that you now have a two-edged tape that is 1" wide. Then fold the two raw edges in toward the middle and iron again (creating your own double-folded bias tape, except it isn't on the bias, but anyway....)
Begin by stitching the tape together for 36" on one side of the apron. Then stitch it to one armhole for 12" approximately. Then leave 24" (or less if you're smaller) for the loop around the neck, but keep stitching the tape together. Then stitch the tape to the other armhole for about 12". Then finish the apron string for the final 36". (Tip: I start by centering the tape at the nape of the neck. Then I pin it to the apron at the neck edges where the armhole begins. This way, I know that the ties are the same length on both sides.)
The neck and armhole connection should look like this:

Post-script: I added a double-width pocket to both of the aprons in the photos. Because they're the kind of aprons you wear when you're making something and you always need pockets when you're making something, am I right?


