Saturday, June 8, 2013

Sculptures by Janet Echelman: Fish Nets and Wide Hips

In my recent web ramblings, I came across a TED talk by fiber artist Janet Echelman, who is the keynote speaker this weekend at the Surface Design Association conference in San Antonio.

Her work is exhilirating! I had to share the video. Her topic is "Taking Imagination Seriously."


For more on Echelman, here's her website: http://www.echelman.com

Friday, May 17, 2013

A Visit from Carol James, Author of 'Fingerweaving Untangled' and 'Sprang Unsprung'

Wonderful things can happen just by chance -- as when I recently got an email from Carol James, author and teacher on the ancient textile techniques of fingerweaving and sprang.

Seems that she was headed from her home in Winnipeg, Manitoba, for upstate New York and on to Virginia -- specifically Mount Vernon, where she was to donate a thread-by-thread replica of a sprang sash woven in 1709 and worn by George Washington.

Would our weavers' guild like her to visit? Of course!

Her books arrived on my doorstep a few days before the author herself: Fingerweaving Untangled (available from Amazon by clicking here) and Sprang Unsprung (available from Amazon by clicking here), both offering colorful and clear tutorials on their respective techniques. And then Carol herself arrived, bringing along a suitcase full of samples and a special bag holding the 7-foot-long sash. It was a thrill to see this masterwork. (The photo below doesn't really do it justice, but it gives you some idea of the work and skill involved).

James and her replica of Washington's sash

A few of the details from her talk on sprang, which dates back as far as the Bronze Age, when it was used to create garments: She showed us photos of wonderfully detailed sprang caps on peat bog bodies in Copenhagen and told us about a researcher in Munich who has found images of sprang in ancient Greek statuary. Through the Middle Ages sprang was likely the method used to make stockings and other clothing, and from the 1600s on, it was used to make military sashes such as the one worn by George Washington. 

A detail of the sash, which was woven in reeled silk
and dyed with madder and cochineal

Sprang is a braiding technique, says James. There is only warp and no weft, resulting in textiles that are highly elastic. The noted rug weaver and author Peter Collingwood has been quoted as saying it is the ideal method for making clothing. She enthuses, "The best part is that you get TWO rows of cloth for every one row worked."

Many thanks to Carol for visiting and for sharing her knowledge with us. Soon, visitors to Mount Vernon will be able to see, for the first time, what Washington wore as a sign of his military leadership. The original is tucked away in storage, far too fragile to be on display. Which means that another piece of our textile heritage has been brought to light.

For more on Carol James and her work, visit her website at http://sashweaver.com/


Saturday, April 20, 2013

Scenes from a Natural Dye Class: SerenDIPity!


Yesterday at the Weaving and Fiber Arts Center, I taught a class on natural dyeing with indigo and onion skins. As always with natural dyes, the results were magical. To my eye, we achieved some wonderful colors -- jonquils, saffron, green grass, flax flowers, blue skies, and late twilight.

Working with vats of onion-skin dyes and indigo, we created base colors of either yellow or blue. But even with two simple dye recipes, the colors varied greatly, depending on the fiber used and the amount of time it was in the dye bath.

The indigo vat: a powerful brew!

A silk scarf that was lying in the onion-skin vat for -- who knows -- an hour?

About the silk scarf above: We immersed it in the onion-skin vat and then forgot about it! I love the serendipity of "mistakes" like this. The color was vibrant. Hoping to get a photo in natural light, I took it outside to try to capture the color, which was almost a saffron yellow.

The class was titled "Ombre Dyeing with Indigo and Onion Skins," and the aim was to achieve a gradation of three or more colors on fiber or fabric.

 Leslie Moran's commercial cotton fabric, dyed first in onion skin and then in indigo.
 
Judith Trolley tried some ombre-dyeing on Black-Faced Leicester roving, to be handspun and used as a warp.

We achieved colors from pale yellow to deep saffron, from light green to dark teal, from pale blue to midnight, some of which you can see in the pieces on the drying rack below.


For me, the happiest surprise happened with another "mistake." I had a long piece of silk gauze, which I immersed in the indigo vat and then immersed in the onion-skin vat, to achieve random sections of blue and green -- which I got, vividly, and did not like. (See the image in the bottom-right corner of the photo above.) So I kept dipping it in indigo, maybe five times, then letting it oxidize on the rack, hoping to get a deep blue color.

Except I forgot about it as I was teaching -- left it bunched up in the sink, without rinsing or placing it on the rack to oxidize. Later, when I found it, the thiox (the discharge chemical in the indigo bath) had worked magic, marbling and mixing the colors. You can see the results in the photo below (and at the start of this post):


If you've seen the masterpieces of Carter Smith, who uses acid dyes, you'll know what I'm striving for. This technique -- starting with indigo, immersing it in another dye vat, then creating shibori resists (on purpose, rather than by mistake) -- is worth exploring.

Wednesday, March 27, 2013

Wagon Wheels on the Road


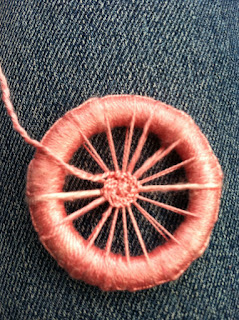
The wagon wheels I refer to are buttons - namely Dorset Buttons in the wagon wheel design. I've blogged about these beautiful little buttons before - how they were created in Britain in the 17th century. Button makers in Dorset, England, became so expert and productive in making these buttons that an entire industry developed, only to collapse in the 19th century when button-making became industrialized.

Dorset Buttons, specifically the wagon wheel style pictured above, can be highly elaborate and beautiful, almost like jewelry. I love to make them. And what's best about this technique - for people who make garments - is that you can create one-of-a-kind buttons using the same yarns that you used in your garment. (I don't think it's unusual for textile nuts like me to spend hours on the Internet - even worse, wandering around JoAnn's or traveling to New York or Toronto to visit one of those wonderful stores that sell only buttons, scouring the store, and then buying only ONE button.)

They travel well, too. All you need is a plastic ring, yarn, a tapestry needle, and embroidery scissors. And beads, if you choose. All of which can fit into a purse.

On the road back and forth to Philly to visit family for Passover, I practiced my buttony. (That's what the British call it. Sounds British, doesn't it?)

Here's my favorite.


This one was made using beading thread: Micro C-Lon Cord, in purple (doesn't show up well in the photo), orange, and chartreuse, along with matching seed beads. If you look closely at the photo, you may be able to see that the purple beads and the orange beads are iridescent, which I really like.

Here's another wagon wheel. This uses hand-dyed 20/2 spun silk yarn in navy and fuchsia. I embellished it with French knots in pale pink silk. Flowers for spring!


Sunday, March 3, 2013

Wool, Silk, Stainless Steel, and a Bad Cold...


For the past nine days -- nine days! -- I've had that cold everybody's complaining about. I've been out of the house twice for my job and, well, to look for my own shadow, like Punxsutawney Phil.

Staying home can be great, however, if you keep at your fiber work. So I've completed and/or photographed a lot of pieces that are now posted on Etsy. The scarf above -- I call it my "Taos Pueblo Scarf" -- plays with colors of adobe brick and pale turquoise, using two different fabrics.

The base fabric is a scarf of wool and silk, a blank purchased from Dharma, which I dyed in aqua, then overdyed in brick, and then shibori-folded and clamped and immersed in a discharge vat.

The upper layer is a machine-knitted scarf in wool/stainless steel that I purchased from Habu Textiles in Manhattan. (It's a really fine yarn, 70% wool and 30% stainless steel -- just one of the many wonderful fibers you'll find at Habu. If you don't know about this supplier, you need to! Click here: http://www.habutextiles.com)

Honestly, I wasn't really pleased with the wool/silk base scarf on its own -- when, to my delight, I realized that the knitted scarf matched it really well. I sewed the two layers together, using a zigzag stitch on my machine, tracing the shibori patterns on the base scarf, like so:


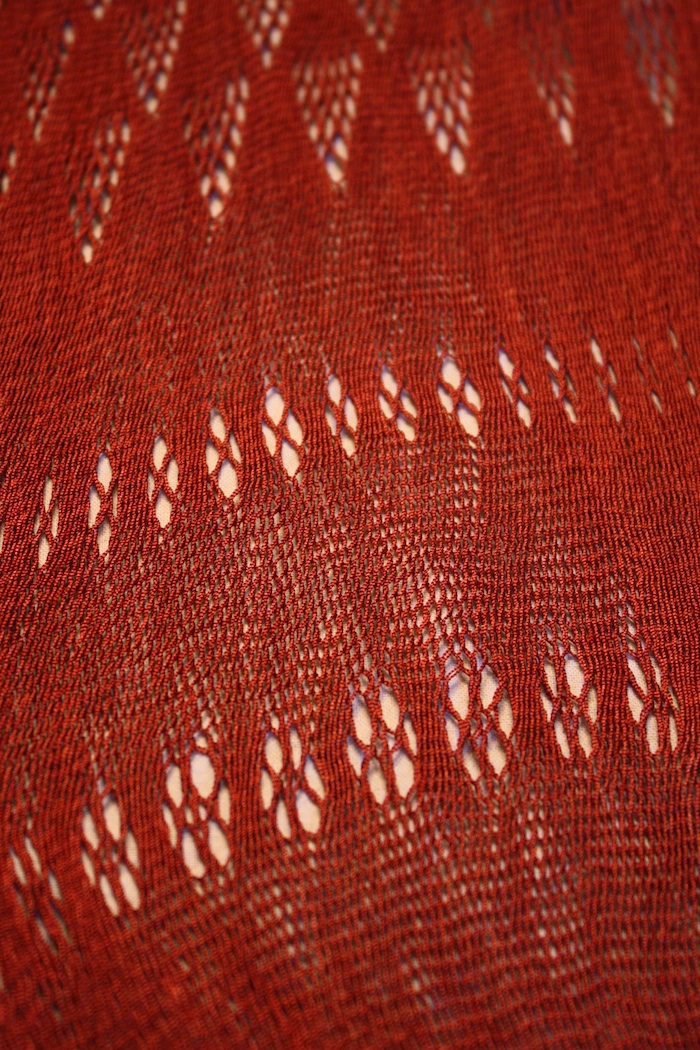
This scarf is one of my favorites! But so is the single layer, using just the stainless steel/wool. Here's what it looks like, on its own, machine-knitted using a knit 5, slip 3 pattern:


When you stretch this scarf, it stays in place, creating a wonderful crimped and lacy effect.


I hope to publish more posts soon, highlighting some recent work and upcoming classes. Thanks for visiting!

Monday, December 10, 2012

An Olive and Gold Neck Cowl for Wintertime


Here's Lynnie, my son Jake's significant other, wearing the newest addition to my Etsy shop: a neck warmer in olive green and mustard gold, handknit in nubby handspun.

The construction is simple: I knitted it lengthwise, as you would a scarf, in alternating stripes. The nubbier stripe uses thick-and-thin handspun in the moss stitch, while the smoother stripe uses two-ply worsted-weight yarn in the stockinette stitch.

You might also wear this on your head, as a very thick and warm headband. Or, you may want to make it a holiday gift for the fashionable dog.


Above: Biggie Smalls, Jake and Lynn's French bulldog/Boston Terrier semi-puppy. He knows how to pose!