Saturday, April 20, 2013

Scenes from a Natural Dye Class: SerenDIPity!


Yesterday at the Weaving and Fiber Arts Center, I taught a class on natural dyeing with indigo and onion skins. As always with natural dyes, the results were magical. To my eye, we achieved some wonderful colors -- jonquils, saffron, green grass, flax flowers, blue skies, and late twilight.

Working with vats of onion-skin dyes and indigo, we created base colors of either yellow or blue. But even with two simple dye recipes, the colors varied greatly, depending on the fiber used and the amount of time it was in the dye bath.

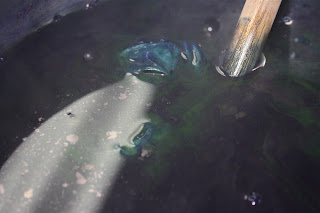
The indigo vat: a powerful brew!

A silk scarf that was lying in the onion-skin vat for -- who knows -- an hour?

About the silk scarf above: We immersed it in the onion-skin vat and then forgot about it! I love the serendipity of "mistakes" like this. The color was vibrant. Hoping to get a photo in natural light, I took it outside to try to capture the color, which was almost a saffron yellow.

The class was titled "Ombre Dyeing with Indigo and Onion Skins," and the aim was to achieve a gradation of three or more colors on fiber or fabric.

 Leslie Moran's commercial cotton fabric, dyed first in onion skin and then in indigo.
 
Judith Trolley tried some ombre-dyeing on Black-Faced Leicester roving, to be handspun and used as a warp.

We achieved colors from pale yellow to deep saffron, from light green to dark teal, from pale blue to midnight, some of which you can see in the pieces on the drying rack below.


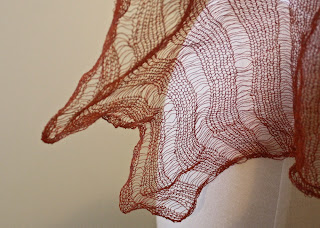
For me, the happiest surprise happened with another "mistake." I had a long piece of silk gauze, which I immersed in the indigo vat and then immersed in the onion-skin vat, to achieve random sections of blue and green -- which I got, vividly, and did not like. (See the image in the bottom-right corner of the photo above.) So I kept dipping it in indigo, maybe five times, then letting it oxidize on the rack, hoping to get a deep blue color.

Except I forgot about it as I was teaching -- left it bunched up in the sink, without rinsing or placing it on the rack to oxidize. Later, when I found it, the thiox (the discharge chemical in the indigo bath) had worked magic, marbling and mixing the colors. You can see the results in the photo below (and at the start of this post):


If you've seen the masterpieces of Carter Smith, who uses acid dyes, you'll know what I'm striving for. This technique -- starting with indigo, immersing it in another dye vat, then creating shibori resists (on purpose, rather than by mistake) -- is worth exploring.

Wednesday, March 27, 2013

Wagon Wheels on the Road


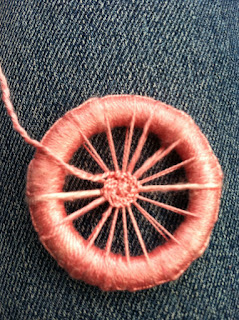
The wagon wheels I refer to are buttons - namely Dorset Buttons in the wagon wheel design. I've blogged about these beautiful little buttons before - how they were created in Britain in the 17th century. Button makers in Dorset, England, became so expert and productive in making these buttons that an entire industry developed, only to collapse in the 19th century when button-making became industrialized.

Dorset Buttons, specifically the wagon wheel style pictured above, can be highly elaborate and beautiful, almost like jewelry. I love to make them. And what's best about this technique - for people who make garments - is that you can create one-of-a-kind buttons using the same yarns that you used in your garment. (I don't think it's unusual for textile nuts like me to spend hours on the Internet - even worse, wandering around JoAnn's or traveling to New York or Toronto to visit one of those wonderful stores that sell only buttons, scouring the store, and then buying only ONE button.)

They travel well, too. All you need is a plastic ring, yarn, a tapestry needle, and embroidery scissors. And beads, if you choose. All of which can fit into a purse.

On the road back and forth to Philly to visit family for Passover, I practiced my buttony. (That's what the British call it. Sounds British, doesn't it?)

Here's my favorite.


This one was made using beading thread: Micro C-Lon Cord, in purple (doesn't show up well in the photo), orange, and chartreuse, along with matching seed beads. If you look closely at the photo, you may be able to see that the purple beads and the orange beads are iridescent, which I really like.

Here's another wagon wheel. This uses hand-dyed 20/2 spun silk yarn in navy and fuchsia. I embellished it with French knots in pale pink silk. Flowers for spring!


Sunday, March 3, 2013

Wool, Silk, Stainless Steel, and a Bad Cold...


For the past nine days -- nine days! -- I've had that cold everybody's complaining about. I've been out of the house twice for my job and, well, to look for my own shadow, like Punxsutawney Phil.

Staying home can be great, however, if you keep at your fiber work. So I've completed and/or photographed a lot of pieces that are now posted on Etsy. The scarf above -- I call it my "Taos Pueblo Scarf" -- plays with colors of adobe brick and pale turquoise, using two different fabrics.

The base fabric is a scarf of wool and silk, a blank purchased from Dharma, which I dyed in aqua, then overdyed in brick, and then shibori-folded and clamped and immersed in a discharge vat.

The upper layer is a machine-knitted scarf in wool/stainless steel that I purchased from Habu Textiles in Manhattan. (It's a really fine yarn, 70% wool and 30% stainless steel -- just one of the many wonderful fibers you'll find at Habu. If you don't know about this supplier, you need to! Click here: http://www.habutextiles.com)

Honestly, I wasn't really pleased with the wool/silk base scarf on its own -- when, to my delight, I realized that the knitted scarf matched it really well. I sewed the two layers together, using a zigzag stitch on my machine, tracing the shibori patterns on the base scarf, like so:


This scarf is one of my favorites! But so is the single layer, using just the stainless steel/wool. Here's what it looks like, on its own, machine-knitted using a knit 5, slip 3 pattern:


When you stretch this scarf, it stays in place, creating a wonderful crimped and lacy effect.


I hope to publish more posts soon, highlighting some recent work and upcoming classes. Thanks for visiting!

Monday, December 10, 2012

An Olive and Gold Neck Cowl for Wintertime


Here's Lynnie, my son Jake's significant other, wearing the newest addition to my Etsy shop: a neck warmer in olive green and mustard gold, handknit in nubby handspun.

The construction is simple: I knitted it lengthwise, as you would a scarf, in alternating stripes. The nubbier stripe uses thick-and-thin handspun in the moss stitch, while the smoother stripe uses two-ply worsted-weight yarn in the stockinette stitch.

You might also wear this on your head, as a very thick and warm headband. Or, you may want to make it a holiday gift for the fashionable dog.


Above: Biggie Smalls, Jake and Lynn's French bulldog/Boston Terrier semi-puppy. He knows how to pose!

Wednesday, November 14, 2012

Homespun


Some time ago, a friend described me as being more "homespun" that she was. I took it poorly at the time: Didn't that mean something humble, not artful, probably plain?

Nowadays I have a different take on the word, a lot more positive -- in part because handspun is homespun! The word can mean something beautiful. Or at least I try to spin something beautiful.


Lately, I've been working on spinning a two-ply thick-and-thin yarn: above, in merino and silk. Your first ply alternates between very thin and very thick, while your second ply is as even as your fingers can make it. Both plies are overspun slightly. When you ply them together, you use the even ply as a binder and you loop the thick-and-thin ply around it, as playfully as can be.

This technique is well described and illustrated in "Spin Art: Mastering the Craft of Spinning Textured Yarn" by Jacey Boggs. You can learn more about it here: http://www.youtube.com/watch?v=kAEx88UX-6Y

At the top of the page and below are photos of two yarns spun in merino. All are available now in my Etsy shop, Random Acts of Color..


Friday, October 19, 2012

Shibori Dyeing with Walnut and Indigo

 
Silk chiffon, first dyed with indigo, 
then shibori-dyed using walnut

It's not easy, at least in my view. The colors of natural dyes are far more subtle and the behavior of natural dyes is far more quixotic than with man-made dyes. With acid dyes, what you want to achieve and what you achieve can be one and the same, or very close. With natural dyes -- well, it depends and it depends.

How much dye do you use? Which mordant and how much? How long do you let the fabric "cure"? Indigo, of course, has quite predictable colors -- but try creating shibori effects. Not so easy!

Even so, I insist on trying, because the colors are so gentle and the patterns so intriguing.

Quilting cotton, first dyed with cochineal,
then over-dyed with indigo, then tied and immersed in walnut,
then clamped and immersed in indigo

In addition to the challenge of achieving predictable results, I think it's the softness of the colors that distinguishes natural dyes from man-made dyes. It's an understated palette -- unless, that is, you devote countless hours to dyeing and overdyeing, in order to achieve really saturated colors.

Wool gauze, dyed in two successive walnut baths,
then clamped with resists and immersed in a discharge vat,
and finally clamped with resists and immersed
several times in an indigo vat

This last fabric, pictured above, was perhaps the hardest-won, in terms of the colors achieved. First I immersed it in walnut. Then, not quite satisfied with the depth of color, I created another walnut vat and immersed the fabric once again. I might have stopped there -- the color was a deep, rich brown -- but I wanted some kind of resist pattern on the piece. So I tied it up and immersed it in a discharge vat, then retied it and immersed it in an indigo vat. The results were disappointing -- VERY disappointing. A wrinkled fabric the color of mud, with a darker muddy pattern and permanent creases from the heat of the dye vat. (No photos of THAT, needless to say.)

Final steps: trying once again, I threw the whole piece in a discharge vat. It worked like a giant eraser, taking out all the color of the previous two steps. Back to a rich walnut color. Finally I clamped the piece with resists and immersed it again in a highly concentrated indigo vat. Yay! Colors and pattern that work just fine.

I'm teaching the course next spring at the Weaving and Fiber Arts Center. Details to appear soon in the "Classes" section of this blog.


Name Drafts Aren't Just for Overshot....

  Above is a name draft using -- why not? -- the name Michelangelo, employing an Echo threading and a twill tieup and treading. A name draft...