

Just finished: this sample above on 8 shafts, in preparation for my workshop at Convergence this July. (For details, click here and scroll down to the eleventh listing.) I'm using 10/2 pearl cotton in the warp, sett at 36 epi, with a 20/2 pearl cotton weft (in black). I like to call it "Many Rivers" because of the vertically flowing design.
In this blog post, I'll try to outline the steps it took to design this in Fiberworks. No easy task, learning how to do this! But it's so worth it: While weaving most any pattern can be a delightful journey, it's a great pleasure to create your own designs and then weave them up to see exactly what happens. I encourage you to try.
So here goes! (Note: I have a Mac, so keep in mind that the commands in Fiberworks may differ slightly for PCs.)
STEP 1: Create a design line

Using the "Draw Freehand" button, I designed curves that change in shape and size. Try it! Any rounded forms will do for starters.
STEP 2: Create a networked threading based on the design line

Click on the drop-down menu under "Warp" and then click "Redraw on network." A box will appear and you want it to have these settings: "No reduction," "Straight Twill" (under "Style of Initial"), "4" (under "Height of the Initial"). (You do not need to enter anything under "Set Result to X Shafts.") Then click "Apply" and "Accept." Voila! You've created a networked threading.
Notice how the curves in the threading, based on a twill structure, follow the curves of the design line. If you want to learn more about network drafting, the definitive book is written by Alice Schlein.
STEP 3: Create an extended parallel threading
Again in the drop-down menu under "Warp," this time click on "Parallel Repeat," then "Extended Parallel," "Shafts Shift by 4," and then "Apply."
This threading may look at little strange if you're not familiar with extended parallel threadings. (For more on this, read the first four paragraphs of my blog post here.) But look carefully at the threading and compare it with the threading in the previous image: The first and second warp threads in the earlier image are on 1 and 2. In the second image, the extended parallel threading shown above, the first warp end is on 1, followed by its "echo" four shafts higher on 5. The second warp end is on 2, followed by its "echo" four shafts higher on 6. Echo threadings are in two parallel lines. Corkscrew twills are based on this concept as well. The threading goes round and round.
STEP 4: Assign colors to your extended parallel threading

In the "Warp" drop-down, click on "Fill Warp Colors." In the next box, set the colors for "AB," then drag the colors you want from the color panel into boxes A and B. Then click "Replace."
Why use two different colors? As each thread in the original networked draft is followed by its echo or parallel, so you have to distinguish these parallel patterns by using different colors. Otherwise, you wouldn't see the echo! So the colors are always A-B-A-B, etc. (In Marian Stubenitsky's book, Weaving with Echo and Iris, she often designs with as many as four different colors on four parallel threadings, for the beautiful effect that she terms "iridescence.")
STEP 4: Create a twill tieup
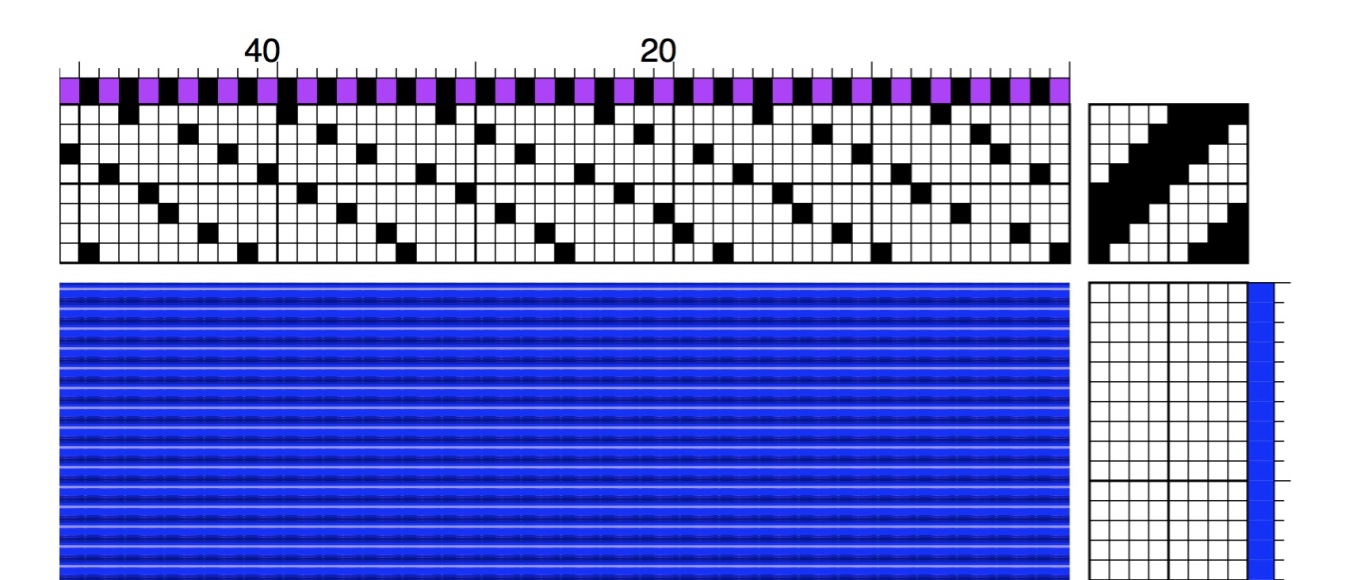
That's a simple twill repeat, rising, with 4 shafts up and 4 shafts down. This means that, for any warp thread and its parallel (for any pair of purple and black threads), one is up and one is down at any given time. This is the 4-shaft interval for the parallel threading, allowing the patterns to play one against the other.
STEP 5: Decide on a treadling pattern, based on a twill

I chose an advancing point twill, with a pattern of 1-2-3-4-5-4-3, 2-3-4-5-6-5-4, etc. I love the way the "points" in the treadling seem to sparkle in the drawdown! But there's a problem: there are long floats in the warp. If you can't tell just by looking at the drawdown, it's a good idea to check: You do this by clicking on the "Tools" menu, and then clicking on "Float Search." You can search for floats of any number in both warp and weft -- but Bonnie Inouye suggests that, with Echo, you don't want floats of more than 5 ends or 5 picks. That's a lot, particularly if you're using threads that are as thick as 10/2 cotton or thicker.
STEP 6: Change the tieup, if needed, to reduce the number of floats

So that's the how-to. Hope it's clear enough to get you started. And then, if you're really ambitious, you can begin designing other patterns using different tieups and treadlings. For instance...
STEP 7: Bonus! Add tabby for Turned Jin.

In any event, here's how to do this: Under the "Treadling" drop-down menu, scroll to the end and click on "Insert Tabby." What you'll get is a form of tabby -- but you'll have to adjust it so that treadle 1 lifts shafts 1, 3, 5 and 7 and treadle 2 lifts shafts 2, 4, 6 and 8. It's always a reward to see the design nice and clear and neat -- which is why I love Jin.
Here, in conclusion, is a detail of the back side of my Echo sample, which is quite different from the front, pictured at the beginning of this post. Thanks for reading!

4 comments:
Love these step by step instructions.
I hope someone can help me. I have a PC I found the "Draw Freehand" button, but I click on "Warp" and I can't find anything except, "Redraw on a network". Can anyone help me? Where do I go from the Draw Freehand button?.
Thanks,
Alice
Nice content Thanks for sharing .. BIM Consulting
BIM Solutions
BIM Solutions in UK
Shop Drawings Preparation in UK
I simply used Blogger.com to set it up, and I chose one of the templates they offer. Thanks for your comments.
Post a Comment