Showing posts with label advancing point twill. Show all posts

Tuesday, November 19, 2019

No Weaving Software, Just Pencil and Paper: A Primer on Network Drafting


This post is for folks who wonder what network drafting means -- people who hear the term and have only a vague idea of curves and circles -- and want to know more.

(For those who understand the concept and want to dig further, I suggest you buy a copy of Network Drafting: An Introduction, the definitive work on the subject written by Alice Schlein and available by clicking here on Amazon. Schlein is the brilliant weaver and designer who introduced network drafting to the weaving community back in the 1990s through a series of articles in Weaver's magazine.)

Fundamentally, computers and weaving software have brought the world of network drafting to the weaving community at large. Still, the best way to learn how it works, according to Schlein, is to begin with a pencil and graph paper. This way you will understand the basics of network drafting -- instead of not knowing what happens when you tell your computer software to "Redraw on network" after you've created a design line. Also, the pencil and paper method gives you a lot more control if you want to create your own designs.

Moving on: For this blog post, I created a downloadable design grid based on an initial of 4, which is the most commonly used initial.

Here's what it looks like.

If you look closely, you'll notice that there are three empty squares between every gray square, both horizontally and vertically. That means this network is based an initial of 4.

The "initial" can be defined as the foundation or scaffold for your threading -- the only places where you are able to thread your draft, so it really serves as an underlying method for your design. An initial of 4 means that every possible threading on your network is always on the gray squares above, each of which is 4 squares away from the next one, both horizontally and vertically. In essence you have a twill-based threading plan.

(You'll notice that the grid looks something like a twill fabric. I think of it as the twill lines you see on your blue jeans: one warp end up, three weft ends across -- that's how it weaves. Cut the fabric up in a wavy, curving ribbon and thread only the warp pattern on that ribbon and you have the idea of a networked threading.)

Please remember, this tutorial is really just a first step -- a baby step at that. There are so many options and variations, but let's assume you're working with 8 shafts. (Schlein offers many options with 8 shafts alone, but again, this is just a basic tutorial.)

So take your pencil, turn your grid horizontally, and draw a horizontal line across the page. Now draw a second line, this one 8 squares on the grid above the first.


Now draw a curving line across the 8-square-high space you've created on the grid. The line should travel the grid from top to bottom continuously, as with the break you see, which ends at the top and continues at the bottom, as if it were wrapped around the space we're working in. (This is much like an advancing twill line on 8 shafts, which can only go as far as shaft 8, so the next thread can't go on shaft 9 and therefore begins again on shaft 1.)


Now create a second line that is 4 squares above the blue line on your grid. When you can't go above any further, return to square 1 and begin there.


This defines your threading ribbon, which uses an initial of 4 squares for its height. (Remember the ribbon we've cut from our jeans, as mentioned above?) Remember that whenever you reach the top of the black horizontal line, you need to circle around to the first square again. 

Now you want to fill in your ribbon, like so.


At this point I will admit, I'm not much of a graphic artist. But I'm hoping you get the idea.

Finally we create our networked threading, by marking every gray-shaded square that falls within our ribbon. Here's what our example looks like.


Here's what the threading looks like when entered into weaving software. (Keep in mind that I've tweaked our practice ribbon a bit here and there. It's just for the sake of demonstration.)


And here's what our threading looks like when woven as Jin on a 5-thread advancing-point twill.


Not a home run, perhaps, but a good beginning. Remember that networked designs -- as with most weaving designs -- take a good bit of trial and error, lots of playing with the computer, and lots of sampling, before we achieve loom-worthy results.

Thanks for reading!


Saturday, February 17, 2018

How to Design 8-Shaft Echo Using Fiberworks


Just finished: this sample above on 8 shafts, in preparation for my workshop at Convergence this July. (For details, click here and scroll down to the eleventh listing.) I'm using 10/2 pearl cotton in the warp, sett at 36 epi, with a 20/2 pearl cotton weft (in black). I like to call it "Many Rivers" because of the vertically flowing design.

In this blog post, I'll try to outline the steps it took to design this in Fiberworks. No easy task, learning how to do this! But it's so worth it: While weaving most any pattern can be a delightful journey, it's a great pleasure to create your own designs and then weave them up to see exactly what happens. I encourage you to try.

So here goes! (Note: I have a Mac, so keep in mind that the commands in Fiberworks may differ slightly for PCs.)

STEP 1: Create a design line


Using the "Draw Freehand" button, I designed curves that change in shape and size. Try it! Any rounded forms will do for starters.

STEP 2: Create a networked threading based on the design line


Click on the drop-down menu under "Warp" and then click "Redraw on network." A box will appear and you want it to have these settings: "No reduction," "Straight Twill" (under "Style of Initial"),  "4" (under "Height of the Initial").  (You do not need to enter anything under "Set Result to X Shafts.") Then click "Apply" and "Accept." Voila! You've created a networked threading.

Notice how the curves in the threading, based on a twill structure, follow the curves of the design line. If you want to learn more about network drafting, the definitive book is written by Alice Schlein.

STEP 3: Create an extended parallel threading


Again in the drop-down menu under "Warp," this time click on "Parallel Repeat," then "Extended Parallel," "Shafts Shift by 4," and then "Apply."

This threading may look at little strange if you're not familiar with extended parallel threadings. (For more on this, read the first four paragraphs of my blog post here.) But look carefully at the threading and compare it with the threading in the previous image: The first and second warp threads in the earlier image are on 1 and 2. In the second image, the extended parallel threading shown above, the first warp end is on 1, followed by its "echo" four shafts higher on 5. The second warp end is on 2, followed by its "echo" four shafts higher on 6. Echo threadings are in two parallel lines. Corkscrew twills are based on this concept as well. The threading goes round and round.

STEP 4: Assign colors to your extended parallel threading


In the "Warp" drop-down, click on "Fill Warp Colors." In the next box, set the colors for "AB," then drag the colors you want from the color panel into boxes A and B. Then click "Replace."

Why use two different colors? As each thread in the original networked draft is followed by its echo or parallel, so you have to distinguish these parallel patterns by using different colors. Otherwise, you wouldn't see the echo! So the colors are always A-B-A-B, etc. (In Marian Stubenitsky's book, Weaving with Echo and Iris, she often designs with as many as four different colors on four parallel threadings, for the beautiful effect that she terms "iridescence.")

STEP 4: Create a twill tieup


That's a simple twill repeat, rising, with 4 shafts up and 4 shafts down. This means that, for any warp thread and its parallel (for any pair of purple and black threads), one is up and one is down at any given time. This is the 4-shaft interval for the parallel threading, allowing the patterns to play one against the other.

STEP 5: Decide on a treadling pattern, based on a twill

For the treadling, I usually "draw" it in by hand, using the "Draw Freehand" button at the top left. There are lots of other ways to do this, but it's my preferred method.

I chose an advancing point twill, with a pattern of 1-2-3-4-5-4-3, 2-3-4-5-6-5-4, etc. I love the way the "points" in the treadling seem to sparkle in the drawdown! But there's a problem: there are long floats in the warp. If you can't tell just by looking at the drawdown, it's a good idea to check: You do this by clicking on the "Tools" menu, and then clicking on "Float Search." You can search for floats of any number in both warp and weft -- but Bonnie Inouye suggests that, with Echo, you don't want floats of more than 5 ends or 5 picks. That's a lot, particularly if you're using threads that are as thick as 10/2 cotton or thicker.

STEP 6: Change the tieup, if needed, to reduce the number of floats

This means that you will have to add more variety in the tieup, so there are more tie-down threads in the warp. You may have to play with the tieup a bit to see how it works and what you like.

So that's the how-to. Hope it's clear enough to get you started. And then, if you're really ambitious, you can begin designing other patterns using different tieups and treadlings. For instance...

STEP 7: Bonus! Add tabby for Turned Jin.

This is a structure that automatically eliminates floats of longer than 3: Jin! Just by adding tabby to a 4/4 tieup for an extended parallel threading, you can create a Jin design. (It's not TRULY tabby, but rather a half-basket weave, but that's another discussion for another time.)

In any event, here's how to do this: Under the "Treadling" drop-down menu, scroll to the end and click on "Insert Tabby." What you'll get is a form of tabby -- but you'll have to adjust it so that treadle 1 lifts shafts 1, 3, 5 and 7 and treadle 2 lifts shafts 2, 4, 6 and 8. It's always a reward to see the design nice and clear and neat -- which is why I love Jin.

Here, in conclusion, is a detail of the back side of my Echo sample, which is quite different from the front, pictured at the beginning of this post. Thanks for reading!


Saturday, September 16, 2017

Echo... Echo... Echo...


12-shaft Jin currently on the loom, 
woven on an Echo threading. 20/2 handpainted silk warp 
(really two handpainted warps) and 60/2 silk weft, 
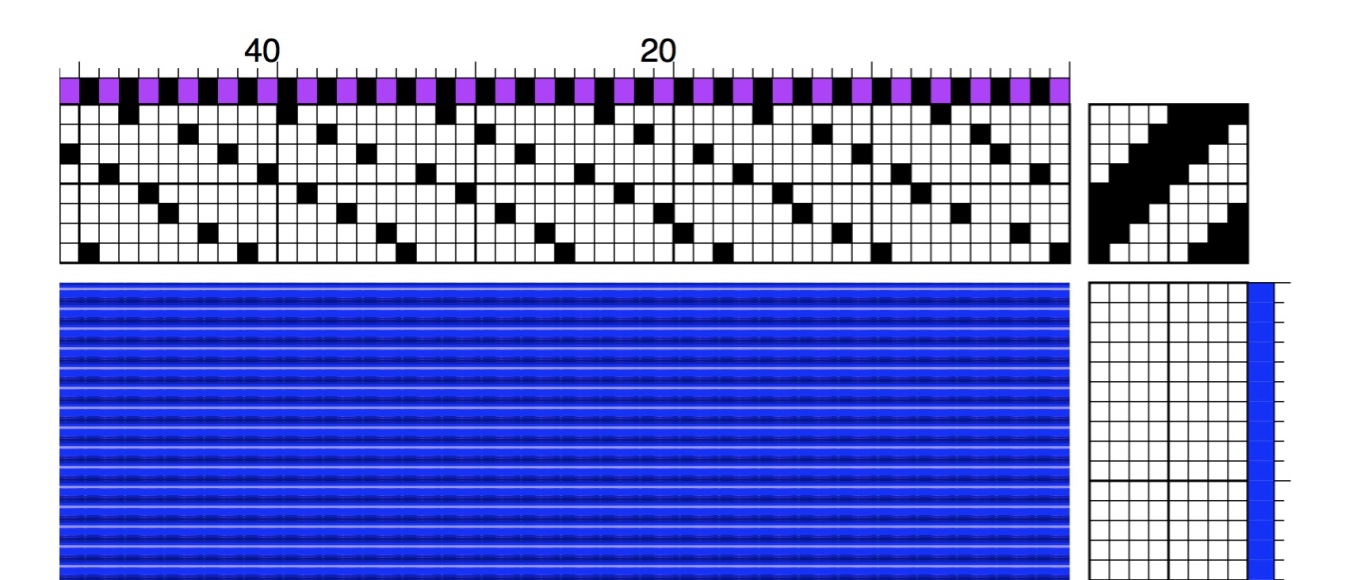
advancing point twill threading and treadling.

The drawdown for the above pattern (the treadling has a long repeat)

Echo enjoys so much popularity these days, thanks to Marian Stubenitsky's wonderful book, Weaving with Echo and Iris.

Above and beyond this groundbreaking book, however, is the beauty and potential of Echo techniques themselves. Because you're weaving on an extended parallel threading, the possibilities are pretty much endless. You can change the treadling and tie-up in myriad ways that will alter the pattern and still weave Echo. Or you can add plain weave to the treadling and weave Jin -- which again can be woven in a variety of patterns. Or you can weave Double Weave. Or Shadow Weave. Or Rep. And you can change to a networked treadling. And on and on.

Looking ahead to Convergence in Reno next summer: I am scheduled to teach a 3-day workshop on "One Warp, Many Structures: An Exploration of Extended Parallel Threading." (For more information, please take a look at the course description here.) Weavers will come to the workshop with their looms threaded in a two-color warp in an extended parallel threading, with enough weft to weave a range of structures using different tie-ups and treadlings. If there's time, we may even cut off and re-sley to weave double weave and shadow weave. As I've experienced myself with the 12-shaft structure above, it's a process of endless discovery.

Preparing for the workshop, I've been playing with drafts for 4-shaft and 8-shaft looms. Below are some of the designs I'm working on to date. Woven samples will come later.

 A 4-shaft advancing twill on an Echo threading, 
advancing point-twill treadling
 An 8-shaft networked design on an Echo threading
A traditional point-twill design known as the Earl on 8 using an Echo threading

4-shaft Cat Tracks and Snail Trails (also known as Wandering Vine), 
woven as Jin on an Echo threading

Comments, questions, ideas welcome! Much work to be done and lots of discoveries in the making. Thanks for reading!


Sunday, February 12, 2017

More from the Warp That Keeps on Giving: Turned Taqueté


At this point, the problem is making a decision -- ANY decision, for crying out loud! I have been able to weave so many patterns on this warp -- an extended parallel threading -- that it's hard to choose which one I like the best.

So far, I have woven maybe maybe 10 different patterns, using two different tie-ups and lots of different treadlings. I've finally decided on the two in the photo above. (Not one, but two -- but that's OK, because I like the way they work together.)

Both patterns are treadled as Turned Taqueté, which I've blogged about extensively because it's such a beautiful structure. The diamond-shaped pattern is created with a simple advancing point twill treadling. Here's how it looks close up:


And here's the drawdown:
For the other pattern, I created a networked treadling based on an initial of 2. Here's the drawdown for that.


So now I have about 8 yards left to weave, which is hopefully enough to make a garment. Lots of keeping track of complicated treadlings -- once again, an argument for purchasing a computerized loom....

And here's one more image, this one of Echo Weave woven on the same warp using a point-twill treadling. My thinking is that this pattern looks good close up, but from a distance of a yard away or more -- which is the kind of distance I like for viewing a garment -- it doesn't show up as well.


Thanks for reading! More to come as I begin creating collapse-weave samples on my table loom, in preparation for workshops I'm teaching in the summer.