Showing posts with label design line. Show all posts

Tuesday, January 15, 2019

Midwinter Night's Dream: How to Design 4-Color Echo


From this...

To this...

And this...

And this...

And this!

Four-color Echo seems to be at the top of every weavers "To Do" list these days -- chiefly because of the flowing lines and delightful iridescence. There are lots of drafts out there, certainly, and many gifted weavers creating patterns.

But how do they do it? And, more important, how can you do it on your own?

It's all through the magic of weaving software -- in my case, Fiberworks Silver for Mac. Here are some basic steps I've learned in preparing to teach a workshop for the New Hampshire Weavers Guild in April. 

Step 1:
Choose your yarn in 4 colors for your warp. This is not as easy as it sounds! I recommend starting with 10/2 cotton (or something similar in grist). To keep it simple, start with two colors that are analogous (next to each other) on the color wheel or close to it -- in my case, that was orange and yellow. Then move across the color wheel and choose two more analogous (or close to it) colors -- in my case, purple and blue. You'll want four colors that give you a broad chromatic range.

Step 2:
Calculate your sett, width in reed, and number of warp ends. For Echo, choose a sett that is denser than twill but less dense than double weave. So for 10/2 cotton I chose a sett of 36 epi. My warp was 400 ends, giving me a weaving width of about 11 1/6" in the reed.

Step 3:
Now for the designing. Let's work on 8 shafts, which is what I did for my samples. As always with the curves of Echo, you start with a design line, using the Freehand tool on Fiberworks. Here is a sample design line. (I am showing you a different design from the one I wove for the samples, because I don't want to give away my drafts before the workshop.)


Step 4:
Create a parallel threading. On the Warp dropdown menu, click on "Parallel Repeat." Then click on "Extended Parallel," then enter the number 4 in the box that says "Shafts Shift By." Make sure all the other boxes are unchecked, and then click "Apply." You'll get something like this.


Each warp end in the original design line now has a parallel that is four shafts above it. (Sometimes the parallel appears to bounce around. The reason: For a warp end on shaft 8, the parallel thread that is 4 shafts "above" it is on shaft 1. Because we have only 8 shafts, we have to treat shaft 1 as the "9th" shaft, just as we would with a corkscrew twill.)

Step 5: 
Create a 4-end parallel threading. Fiberworks has instructions on how to do this (which you'll find if you hover your cursor over the "Interleave" command in the drop-down menu under "Warp"). Essentially, it involves opening a second draft and cutting and pasting (really, interleaving) between two drafts. I found that a bit complicated, so I tried to do it another way. And it worked! How I did this: Starting with the parallel threading I created in the image above, I clicked once again on the "Parallel Repeat" option in the Warp dropdown menu. Like before, I clicked on "Extended Parallel" -- BUT this time I entered the number "2" in the box marked "Shafts Shift By." (And of course I made sure the other boxes were unchecked.)

Makes sense, doesn't it? For a 4-end parallel threading on 8 shafts, you'll want an interval of 2 between each warp end (interval of 2 x 4-end parallel = 8). So this is how our 4-end parallel threading looks.

Step 6:
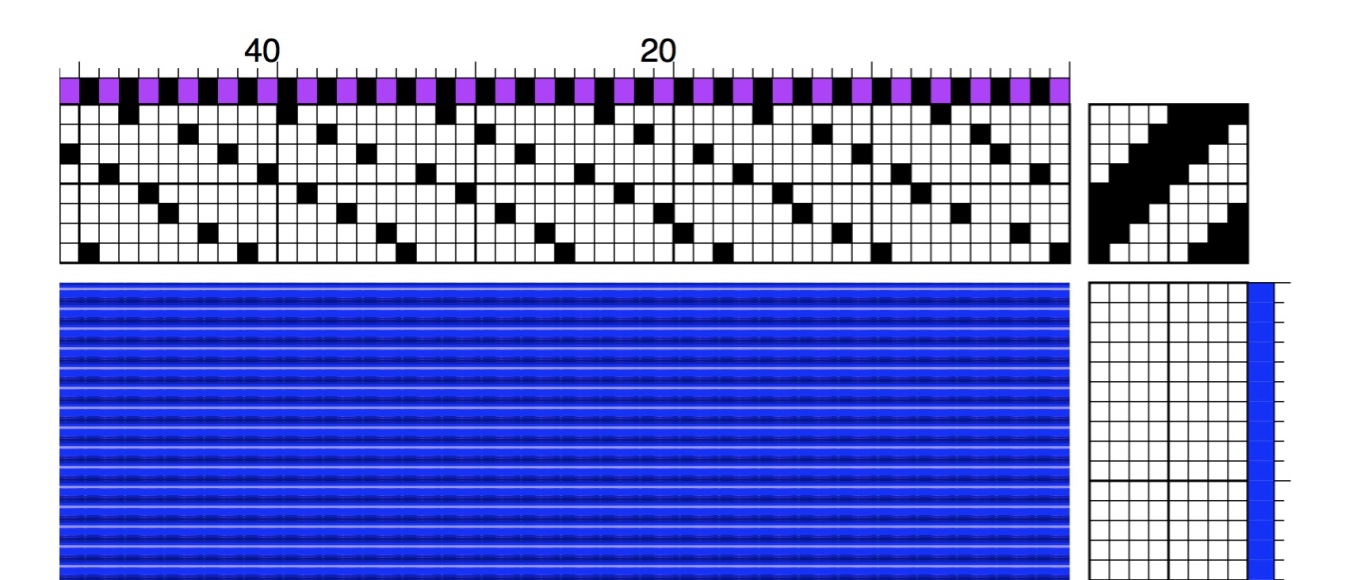
Add your colors. For the PC version, you have to add your colors by hand. For the Mac version, you follow these steps: On the Warp dropdown menu, click on "Fill Warp Colors," then scroll all the way down in the box at the top right to select "ABCD." Four colors will appear in the boxes and, for our demonstration purposes, just click "Replace." (You can play with colors to your heart's content once you've read this tutorial.) Here's how our threading draft looks now.


Step 7:
But what does the full drawdown look like? That, dear reader, is for you to determine. From this point on, you can follow the instructions for Echo tieups and treadlings that I laid out in my blog post here (on February 17, 2018), giving you steps to begin designing your own extended parallel threading drafts. But just to give you an idea of how our demonstration drawdown might look, here's one version. (I'm using a blue weft -- and don't forget, if you're working with 10/2 cotton for your warp, you'll want to use a 20/2 cotton -- about half the grist -- for your weft. And also don't forget that your weft colors will have a big impact on the overall look of your fabric.)


It could use some tweaking for sure -- but not bad for starters. The design possibilities are endless! Thanks for reading. 


Saturday, February 17, 2018

How to Design 8-Shaft Echo Using Fiberworks


Just finished: this sample above on 8 shafts, in preparation for my workshop at Convergence this July. (For details, click here and scroll down to the eleventh listing.) I'm using 10/2 pearl cotton in the warp, sett at 36 epi, with a 20/2 pearl cotton weft (in black). I like to call it "Many Rivers" because of the vertically flowing design.

In this blog post, I'll try to outline the steps it took to design this in Fiberworks. No easy task, learning how to do this! But it's so worth it: While weaving most any pattern can be a delightful journey, it's a great pleasure to create your own designs and then weave them up to see exactly what happens. I encourage you to try.

So here goes! (Note: I have a Mac, so keep in mind that the commands in Fiberworks may differ slightly for PCs.)

STEP 1: Create a design line


Using the "Draw Freehand" button, I designed curves that change in shape and size. Try it! Any rounded forms will do for starters.

STEP 2: Create a networked threading based on the design line


Click on the drop-down menu under "Warp" and then click "Redraw on network." A box will appear and you want it to have these settings: "No reduction," "Straight Twill" (under "Style of Initial"),  "4" (under "Height of the Initial").  (You do not need to enter anything under "Set Result to X Shafts.") Then click "Apply" and "Accept." Voila! You've created a networked threading.

Notice how the curves in the threading, based on a twill structure, follow the curves of the design line. If you want to learn more about network drafting, the definitive book is written by Alice Schlein.

STEP 3: Create an extended parallel threading


Again in the drop-down menu under "Warp," this time click on "Parallel Repeat," then "Extended Parallel," "Shafts Shift by 4," and then "Apply."

This threading may look at little strange if you're not familiar with extended parallel threadings. (For more on this, read the first four paragraphs of my blog post here.) But look carefully at the threading and compare it with the threading in the previous image: The first and second warp threads in the earlier image are on 1 and 2. In the second image, the extended parallel threading shown above, the first warp end is on 1, followed by its "echo" four shafts higher on 5. The second warp end is on 2, followed by its "echo" four shafts higher on 6. Echo threadings are in two parallel lines. Corkscrew twills are based on this concept as well. The threading goes round and round.

STEP 4: Assign colors to your extended parallel threading


In the "Warp" drop-down, click on "Fill Warp Colors." In the next box, set the colors for "AB," then drag the colors you want from the color panel into boxes A and B. Then click "Replace."

Why use two different colors? As each thread in the original networked draft is followed by its echo or parallel, so you have to distinguish these parallel patterns by using different colors. Otherwise, you wouldn't see the echo! So the colors are always A-B-A-B, etc. (In Marian Stubenitsky's book, Weaving with Echo and Iris, she often designs with as many as four different colors on four parallel threadings, for the beautiful effect that she terms "iridescence.")

STEP 4: Create a twill tieup


That's a simple twill repeat, rising, with 4 shafts up and 4 shafts down. This means that, for any warp thread and its parallel (for any pair of purple and black threads), one is up and one is down at any given time. This is the 4-shaft interval for the parallel threading, allowing the patterns to play one against the other.

STEP 5: Decide on a treadling pattern, based on a twill

For the treadling, I usually "draw" it in by hand, using the "Draw Freehand" button at the top left. There are lots of other ways to do this, but it's my preferred method.

I chose an advancing point twill, with a pattern of 1-2-3-4-5-4-3, 2-3-4-5-6-5-4, etc. I love the way the "points" in the treadling seem to sparkle in the drawdown! But there's a problem: there are long floats in the warp. If you can't tell just by looking at the drawdown, it's a good idea to check: You do this by clicking on the "Tools" menu, and then clicking on "Float Search." You can search for floats of any number in both warp and weft -- but Bonnie Inouye suggests that, with Echo, you don't want floats of more than 5 ends or 5 picks. That's a lot, particularly if you're using threads that are as thick as 10/2 cotton or thicker.

STEP 6: Change the tieup, if needed, to reduce the number of floats

This means that you will have to add more variety in the tieup, so there are more tie-down threads in the warp. You may have to play with the tieup a bit to see how it works and what you like.

So that's the how-to. Hope it's clear enough to get you started. And then, if you're really ambitious, you can begin designing other patterns using different tieups and treadlings. For instance...

STEP 7: Bonus! Add tabby for Turned Jin.

This is a structure that automatically eliminates floats of longer than 3: Jin! Just by adding tabby to a 4/4 tieup for an extended parallel threading, you can create a Jin design. (It's not TRULY tabby, but rather a half-basket weave, but that's another discussion for another time.)

In any event, here's how to do this: Under the "Treadling" drop-down menu, scroll to the end and click on "Insert Tabby." What you'll get is a form of tabby -- but you'll have to adjust it so that treadle 1 lifts shafts 1, 3, 5 and 7 and treadle 2 lifts shafts 2, 4, 6 and 8. It's always a reward to see the design nice and clear and neat -- which is why I love Jin.

Here, in conclusion, is a detail of the back side of my Echo sample, which is quite different from the front, pictured at the beginning of this post. Thanks for reading!


Sunday, December 17, 2017

Looking Ahead to Convergence 2018: Blooming Leaf on 4 Shafts Using an Extended Parallel Threading

Let's start with the Blooming Leaf pattern -- a classic Overshot pattern we all know and love. I hope to use this structure in an Echo Weave workshop I'll teach next summer. 


It's a 2 1/2-day workshop called "One Warp, Many Structures: An Exploration of Extended Parallel Threading," taking place at Convergence July 6-12 in Reno, Nevada. (Some background: Every two years, the Handweavers' Guild of America sponsors Convergence, a week-long conference that draws weavers and fiber artists from North America and beyond. Go if you can!)

We'll be working on 4 and 8 shafts -- and more, if people wish. For this blog post, I'm focusing on a 4-shaft extended parallel threading, just to give you a taste of what the workshop involves. (Extended Parallel Threading is the key to Echo Weave.)

Here's the basic drawdown we're starting with, based on the Blooming Leaf pattern from Marguerite Porter Davison.


I left out the tabby because we are not weaving Overshot -- but otherwise the 2/2 twill treadling remains the same.

To create an extended parallel threading, you have to double the number of warp ends. (In Fiberworks Silver, which is the program I use, you click on the heading that says "Warp" and then "Parallel Repeat" in the drop-down menu. Then you click on "Extended Parallel," shafts shift by 2, and "Apply.") This way, the threading for 4, 3, 2, 1 becomes 4, 2, 3, 1, 2, 4, 1, 3 -- that is, every thread has its "parallel" in a pattern that is 2 shafts above it. (The secret is that, on just 4 shafts, the parallel for shaft 3 is shaft 1 -- because there is no shaft 5. Because there is no shaft 5, the next shaft "up" after shaft 4 is shaft 1, and so on.)

This is what you get with a parallel threading for Blooming Leaf, with the shafts shifting by 2.

You can still see the Blooming Leaf -- but there are long warp floats and the pattern looks squished vertically. That's because we are using the original treadling from Davison. To design a treadling, I look at the original treadling as a design line -- really, as a profile for the treadling we want to use in our weaving. For each pick, I substituted a 4-pick Crackle block. So the first pick -- treadle 4 on our drawdown -- becomes 4 picks: 4, 3, 2, 3. The next pick -- treadle 3 on the drawdown -- becomes 3, 2, 1, 2. Treadle 2 becomes 2, 1, 4, 1. And so on. Here's the result, which I describe as the Blooming Leaf pattern in Echo Weave treadled as Crackle.

Really, this is where the workshop begins! I just wanted to show you how you get there. (Please rest assured that, at least for me, these designs do not come easily. I spend way too much time, it seems, clicking and changing and correcting errors in Fiberworks before I can begin to wrap my head around what is going on and how to come up with a good design.)

There is lots more to the workshop, because everyone will start with a drawdown using an extended parallel threading and then weave Turned Taquete, rep, Shadow Weave and Double Weave -- all on the same threading. That's the beauty of extended parallel threadings: you can use two colors (or more) in the warp for a stunning interplay of color and form and structure.

So here's what the Blooming Leaf pattern looks like in Turned Taquete. There are no floats longer than 3 ends (while there are 4-end-long floats in the Echo Weave) and you get a very tidy, drapey fabric, which is why I like this structure.


And here it is in Shadow Weave. Pretty subtle, but you see the leaf as kind of embossed pattern.

There will be lots more designs to come, as I begin sampling what we will weave in the workshop. Thanks for reading, and see you in Reno!


Monday, November 20, 2017

Designing with Echo: An Advancing Point Twill Makes It Easy


Pictured above: a drawdown for Echo on 8 shafts. While the design appears to have four colors, there are just two colors in the warp and one in the weft. The design is based on a draft of mine that I call "Fun House" because the swirls and swoops remind me of images in a fun-house mirror.

How do you design something like this? Let's start at the very beginning -- which, with computer drafting, means a design line. Here's the one I started with.
Simple enough, right? Concave and convex curves and then curving lines. Based on this, I created an advancing point twill threading, substituting a point-twill block of four or five ends for each square on the design line. Here's what that looked like when finished.

If you look at the first square in the upper-right-hand corner of the design line, this corresponds to the first five ends of the point-twill in the threading (threaded on shafts 8, 7, 6, 5, and 6). The second square in the upper-right-hand corner of the design line becomes the next five ends on the threading (shafts 7, 6, 5, 4, and 5). So every square in the design line represents a block of point twill threading.

Next, I created a parallel threading, so that I could weave Echo. (A parallel threading on eight shafts usually means that every thread in the original single threading will now have a parallel thread -- usually 4 ends above it.) Here's what the advancing point twill threading above looks like.


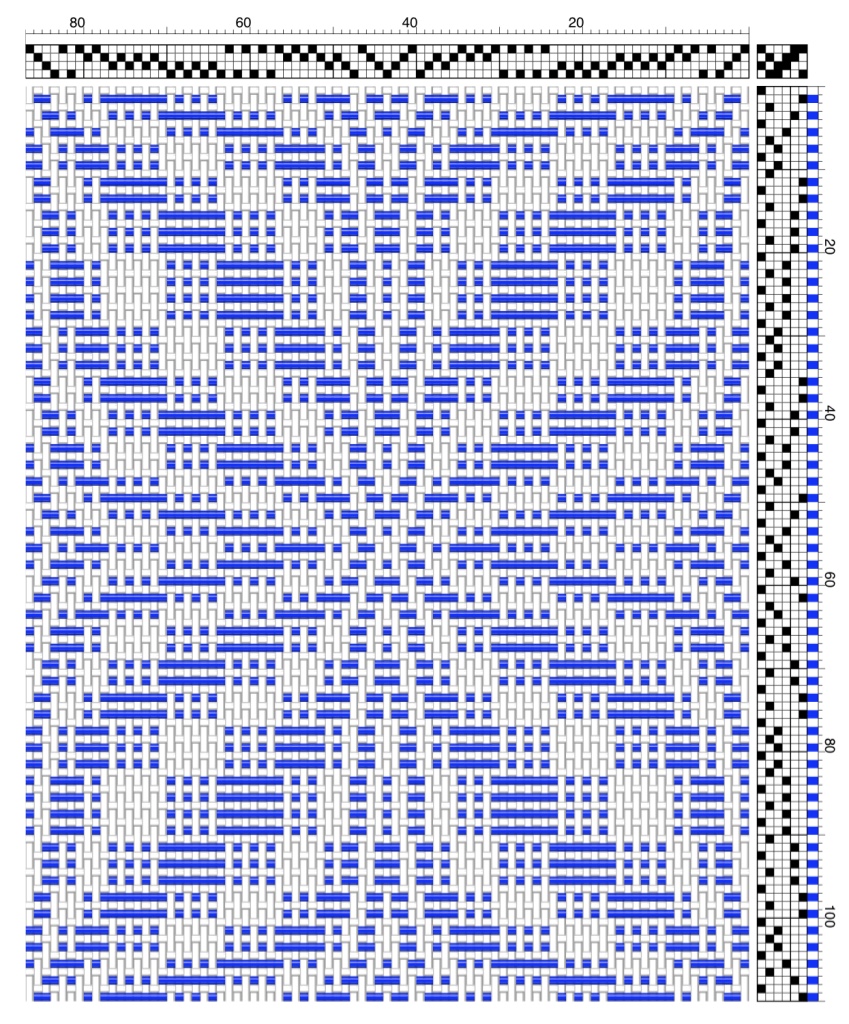
You see the parallel lines? That's part of the technique known as Echo. And here's what the entire draft looks like when woven using the pattern of the original point-twill threading, with a twill tie-up of 1, 1, 1, 1, 2, 2.

There is a long threading pattern, which is hard to see, so here's a detail.


I like it -- and you may too, if you're still reading this! How did I create a parallel threading so that there are now two lines of point twill? This is easily done on Fiberworks by going to the drop-down menu under "Warp," clicking "Parallel Repeat," and then clicking "Extended Parallel," shafts shift by 4, and "Apply."

The original point-twill draft looks great on its own, tromp as writ. So why go to all this computer-drafting trouble? 

If you're interested in learning more about Echo threading and color interaction, Marian Stubenitsky's book, Weaving with Echo and Iris, is an invaluable resource. Many of her designs use four parallel threadings in four different colors to achieve what she calls "iridescence." (Add the additional color of the weft and the results are truly beautiful.) Although my design uses just two colors in the warp and one in the weft, the result is a four-color fabric -- and it's just a one-shuttle weave!


Echo and extended parallel threadings are the subject of my 2 1/2-day workshop at Convergence 2018 in Reno. The official title is "One Warp, Many Structures: An Exploration of Extended Parallel Threadings." The workshop begins on July 10.

Here's another variation of this drawdown, just to pique your interest.
And here is the same draft, this time treadled as Jin (aka Turned Taqueté).

If you've read this far, you need to sign up for the workshop ;o) General registration begins December 6. Thanks for reading.