Wednesday, April 18, 2018

Juried into the Convergence Fashion Show in Reno...


Every two years I set myself a challenge: weave fabric for a garment for submitting to the Convergence fashion show, a biannual conference sponsored by the Handweavers Guild of America. This year, the conference will be held July 6-13 at the Peppermill Resort in Reno, Nevada -- and I'm happy to announce that two garments of mine were juried into the show.


This coat took me two years to complete, from conception to winding warps to dyeing them to weaving the fabric to dyeing the lining and sewing the coat.... It's called "Summer's Lease I," after William Shakespeare's beautiful words, "Summer's lease hath all too short a date" (from his sonnet, "Shall I Compare Thee to a Summer's Day").

I wove the fabric on my 12-shaft Macomber, using a draft I created with extended parallel threading. Then I wound two warps of 20/2 silk, painting one in a range of fuchsia, rose, pink, and lavender and the other in gold, lime green, sage green, and turquoise. The fabric is woven in Echo Weave and Turned Taquete and the weft was 60/2 silk in orange.

Here's the image that inspired my pattern and colors.


I kept it on my computer for years under the title "Paint this Warp." I have no idea where I found it!

For the lining, I purchased yardage of Habotai silk, then dyed it in a range of bright pinks using low-water-immersion dyeing.

I wove about 10 yards of fabric and, having taken Bonnie Inouye's workshop, "Opposites Attract," I began experimenting with other structures, alternating my treadlings for Echo and Turned Taquete and then venturing into Rep and Double Weave. The Double Weave wasn't successful because I did not re-sley my reed for a tighter sett. But the Rep turned out really well, with a weft of hand-dyed Habotai silk ribbon alternating with 60/2 silk.

Here's the second garment that was juried into the fashion show, this one named "Summer's Lease II."


The top is woven in Warp Rep and the skirt is Turned Taquete, cut on the bias. Here's a close-up of the top.


As for patterns: the coat is my own pattern, fashioned after a swing coat I own and love. The skirt and top are my own designs. Photo credits and thanks to Timothy Fuss of Pixelwave, who does a wonderful job photographing handwoven garments.

Hope to see you in Reno!

Sunday, March 18, 2018

How to Warp from Back to Front

As I teach workshops here and there, I'm learning that many weavers dress their looms from front to back -- happily so -- or using a hybrid method rather than beaming back to front.

To my way of thinking, because I like to use fine yarns, back to front is the only way to go. Mainly, you avoid that extra pass through the heddles and the raddle, which can abrade the warp and invite knotting and other problems.

So I thought I would blog about a method that I hope most weavers will try at least once, just to see whether it works for them.


BASIC STEPS IN WARPING BACK TO FRONT
(For more information, see Madelyn van der Hoogt’s notes on the Weaving Today website: https://www.interweave.com/article/weaving/warping-back-to-front/)

1) Place a sturdy rod in the uncut end loops near the cross. Attach the rod to the back (warp) beam.


2) Lay two slats length-wise across your loom, inside the shafts (with the heddles moved away to either side), spanning from the breast beam to the warp beam, one on each side of the castle. These slats – I use 1-yard rulers on my table loom – will support the raddle and the lease sticks so that they don’t sag or wobble as you dress the loom.

3) Laying the raddle on top of your slats, affix it to the side arms or base of the loom, wherever you can attach it (I use small bungee cords). Place the lease sticks through the threading cross in your warp, laying the lease sticks on top of the slats. Secure the lease sticks to the sides of the loom between the back beam and the shafts (I run shoelaces through the holes in the lease sticks and then bring the shoelaces around the sides of the loom, tying the ends of the laces together so that the lease sticks are secured). Once the lease sticks are secured so that the warp ends can’t fall off, remove the yarn that secured the cross in the warp.

4) Spread the warp in the raddle.


5) Once the warp is spread in the raddle (with the heddles pushed to the sides and the reed removed), drape the rest of the warp chain through the castle, over the breast beam, and down to the floor in front of the loom.


4) Keeping the lease sticks tied in place behind the castle, begin winding the warp onto the warp beam. If threads tangle at the lease sticks or anywhere else, go to the front of the loom and pull the warp firmly in sections, combing the warp when necessary to smooth out the threads.


For proper beaming, your warp should look like 
the top photo – NOT the bottom photo.

5) As you wind the warp onto the warp beam, begin inserting heavy paper at least 2" wider or warping sticks 2" longer than the warp width to separate the layers of the warp. Continue, winding a complete turn and then tightening each section of the warp, pulling from the front of the loom. Beaming becomes kind of a dance, where you wind on at the back and then move to the front of the loom to tension the warp – back again to wind on and to the front again to tighten the warp. (Unless you’re winding on with a friend, that is!)


6) Thread the loom.

7) Remove the lease sticks (unless you prefer to weave with them in).

8) Sley the reed.

9) Tie the warp onto the front apron rod. 

And then -- weave away! Thanks for reading.


Saturday, February 17, 2018

How to Design 8-Shaft Echo Using Fiberworks


Just finished: this sample above on 8 shafts, in preparation for my workshop at Convergence this July. (For details, click here and scroll down to the eleventh listing.) I'm using 10/2 pearl cotton in the warp, sett at 36 epi, with a 20/2 pearl cotton weft (in black). I like to call it "Many Rivers" because of the vertically flowing design.

In this blog post, I'll try to outline the steps it took to design this in Fiberworks. No easy task, learning how to do this! But it's so worth it: While weaving most any pattern can be a delightful journey, it's a great pleasure to create your own designs and then weave them up to see exactly what happens. I encourage you to try.

So here goes! (Note: I have a Mac, so keep in mind that the commands in Fiberworks may differ slightly for PCs.)

STEP 1: Create a design line


Using the "Draw Freehand" button, I designed curves that change in shape and size. Try it! Any rounded forms will do for starters.

STEP 2: Create a networked threading based on the design line


Click on the drop-down menu under "Warp" and then click "Redraw on network." A box will appear and you want it to have these settings: "No reduction," "Straight Twill" (under "Style of Initial"),  "4" (under "Height of the Initial").  (You do not need to enter anything under "Set Result to X Shafts.") Then click "Apply" and "Accept." Voila! You've created a networked threading.

Notice how the curves in the threading, based on a twill structure, follow the curves of the design line. If you want to learn more about network drafting, the definitive book is written by Alice Schlein.

STEP 3: Create an extended parallel threading


Again in the drop-down menu under "Warp," this time click on "Parallel Repeat," then "Extended Parallel," "Shafts Shift by 4," and then "Apply."

This threading may look at little strange if you're not familiar with extended parallel threadings. (For more on this, read the first four paragraphs of my blog post here.) But look carefully at the threading and compare it with the threading in the previous image: The first and second warp threads in the earlier image are on 1 and 2. In the second image, the extended parallel threading shown above, the first warp end is on 1, followed by its "echo" four shafts higher on 5. The second warp end is on 2, followed by its "echo" four shafts higher on 6. Echo threadings are in two parallel lines. Corkscrew twills are based on this concept as well. The threading goes round and round.

STEP 4: Assign colors to your extended parallel threading


In the "Warp" drop-down, click on "Fill Warp Colors." In the next box, set the colors for "AB," then drag the colors you want from the color panel into boxes A and B. Then click "Replace."

Why use two different colors? As each thread in the original networked draft is followed by its echo or parallel, so you have to distinguish these parallel patterns by using different colors. Otherwise, you wouldn't see the echo! So the colors are always A-B-A-B, etc. (In Marian Stubenitsky's book, Weaving with Echo and Iris, she often designs with as many as four different colors on four parallel threadings, for the beautiful effect that she terms "iridescence.")

STEP 4: Create a twill tieup


That's a simple twill repeat, rising, with 4 shafts up and 4 shafts down. This means that, for any warp thread and its parallel (for any pair of purple and black threads), one is up and one is down at any given time. This is the 4-shaft interval for the parallel threading, allowing the patterns to play one against the other.

STEP 5: Decide on a treadling pattern, based on a twill

For the treadling, I usually "draw" it in by hand, using the "Draw Freehand" button at the top left. There are lots of other ways to do this, but it's my preferred method.

I chose an advancing point twill, with a pattern of 1-2-3-4-5-4-3, 2-3-4-5-6-5-4, etc. I love the way the "points" in the treadling seem to sparkle in the drawdown! But there's a problem: there are long floats in the warp. If you can't tell just by looking at the drawdown, it's a good idea to check: You do this by clicking on the "Tools" menu, and then clicking on "Float Search." You can search for floats of any number in both warp and weft -- but Bonnie Inouye suggests that, with Echo, you don't want floats of more than 5 ends or 5 picks. That's a lot, particularly if you're using threads that are as thick as 10/2 cotton or thicker.

STEP 6: Change the tieup, if needed, to reduce the number of floats

This means that you will have to add more variety in the tieup, so there are more tie-down threads in the warp. You may have to play with the tieup a bit to see how it works and what you like.

So that's the how-to. Hope it's clear enough to get you started. And then, if you're really ambitious, you can begin designing other patterns using different tieups and treadlings. For instance...

STEP 7: Bonus! Add tabby for Turned Jin.

This is a structure that automatically eliminates floats of longer than 3: Jin! Just by adding tabby to a 4/4 tieup for an extended parallel threading, you can create a Jin design. (It's not TRULY tabby, but rather a half-basket weave, but that's another discussion for another time.)

In any event, here's how to do this: Under the "Treadling" drop-down menu, scroll to the end and click on "Insert Tabby." What you'll get is a form of tabby -- but you'll have to adjust it so that treadle 1 lifts shafts 1, 3, 5 and 7 and treadle 2 lifts shafts 2, 4, 6 and 8. It's always a reward to see the design nice and clear and neat -- which is why I love Jin.

Here, in conclusion, is a detail of the back side of my Echo sample, which is quite different from the front, pictured at the beginning of this post. Thanks for reading!




Tuesday, January 16, 2018

Sample, Sample, Sample: Echo on 4 Shafts in 10/2 Cotton


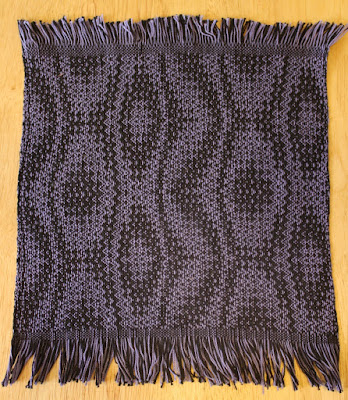
The above sample is Echo on 4 shafts in 10/2 cotton, sett at 30 ends per inch. So much to say about the drafts I've been weaving up! If you're a handweaver -- and if you use weaving software -- you know all too well that there can be a world of difference between the drawdown on the screen and the actual handwoven fabric. Which is why we follow the mantra, "Sample, sample, sample."

I started this post with my favorite sample out of some 10 I have woven this month, all in preparation for my workshop this summer at Convergence in Reno. "One Warp, Many Structures" will explore extended parallel threadings and how they allow you to weave a wealth of structures, from Echo to Jin to Rep, Double Weave, and even Shadow Weave and collapse fabric, all on one warp. (Some structures require re-sleying for a denser sett, but all are on the same threading.)

The sample above began with a simple design line which I used as the basis for a twill threading -- which I then turned into a parallel threading with an interval of 2. Red and black warp ends were on an extended parallel threading (that is, every other thread, so that they weave in opposing sheds). I wove it with a 2-2 twill tieup using a 20/2 cotton weft in black.

No drawdowns to show because they are part of the workshop. (I don't want to give everything away beforehand.) But here are a few more samples to give you an idea of what we'll cover.

Another treading in Echo, same warp.


And here are the above two samples treadled as Jin, simply by adding tabby (shown in their respective order).


I really love knowing that this is done on 4 shafts. So many possibilities. The point of the workshop is to broaden your depth and breadth of understanding of how to maximize a warp threaded for Echo (or extended parallel threadings, choose your terminology, as Echo itself is a very big umbrella).

Here is the same structure as Double Weave, re-sleyed at 48 epi and woven on a networked treadling. Because it's a two-shuttle weave, the front and back are quite different.


Then there's Shadow Weave, (which I'm not showing because I haven't yet woven a sample). And finally Rep, which I don't find as appealing, but perhaps it's just because I needed to do a bigger sample:


I have another set of samples, these based on Blooming Leaf. Here's the first of the set:


I have many more samples to do -- at least one more on 4 shafts, 3 more on 8 shafts, and hopefully one or two on 12. Until next post, thanks for reading!


Sunday, December 17, 2017

Looking Ahead to Convergence 2018: Blooming Leaf on 4 Shafts Using an Extended Parallel Threading

Let's start with the Blooming Leaf pattern -- a classic Overshot pattern we all know and love. I hope to use this structure in an Echo Weave workshop I'll teach next summer. 


It's a 2 1/2-day workshop called "One Warp, Many Structures: An Exploration of Extended Parallel Threading," taking place at Convergence July 6-12 in Reno, Nevada. (Some background: Every two years, the Handweavers' Guild of America sponsors Convergence, a week-long conference that draws weavers and fiber artists from North America and beyond. Go if you can!)

We'll be working on 4 and 8 shafts -- and more, if people wish. For this blog post, I'm focusing on a 4-shaft extended parallel threading, just to give you a taste of what the workshop involves. (Extended Parallel Threading is the key to Echo Weave.)

Here's the basic drawdown we're starting with, based on the Blooming Leaf pattern from Marguerite Porter Davison.


I left out the tabby because we are not weaving Overshot -- but otherwise the 2/2 twill treadling remains the same.

To create an extended parallel threading, you have to double the number of warp ends. (In Fiberworks Silver, which is the program I use, you click on the heading that says "Warp" and then "Parallel Repeat" in the drop-down menu. Then you click on "Extended Parallel," shafts shift by 2, and "Apply.") This way, the threading for 4, 3, 2, 1 becomes 4, 2, 3, 1, 2, 4, 1, 3 -- that is, every thread has its "parallel" in a pattern that is 2 shafts above it. (The secret is that, on just 4 shafts, the parallel for shaft 3 is shaft 1 -- because there is no shaft 5. Because there is no shaft 5, the next shaft "up" after shaft 4 is shaft 1, and so on.)

This is what you get with a parallel threading for Blooming Leaf, with the shafts shifting by 2.

You can still see the Blooming Leaf -- but there are long warp floats and the pattern looks squished vertically. That's because we are using the original treadling from Davison. To design a treadling, I look at the original treadling as a design line -- really, as a profile for the treadling we want to use in our weaving. For each pick, I substituted a 4-pick Crackle block. So the first pick -- treadle 4 on our drawdown -- becomes 4 picks: 4, 3, 2, 3. The next pick -- treadle 3 on the drawdown -- becomes 3, 2, 1, 2. Treadle 2 becomes 2, 1, 4, 1. And so on. Here's the result, which I describe as the Blooming Leaf pattern in Echo Weave treadled as Crackle.

Really, this is where the workshop begins! I just wanted to show you how you get there. (Please rest assured that, at least for me, these designs do not come easily. I spend way too much time, it seems, clicking and changing and correcting errors in Fiberworks before I can begin to wrap my head around what is going on and how to come up with a good design.)

There is lots more to the workshop, because everyone will start with a drawdown using an extended parallel threading and then weave Turned Taquete, rep, Shadow Weave and Double Weave -- all on the same threading. That's the beauty of extended parallel threadings: you can use two colors (or more) in the warp for a stunning interplay of color and form and structure.

So here's what the Blooming Leaf pattern looks like in Turned Taquete. There are no floats longer than 3 ends (while there are 4-end-long floats in the Echo Weave) and you get a very tidy, drapey fabric, which is why I like this structure.


And here it is in Shadow Weave. Pretty subtle, but you see the leaf as kind of embossed pattern.

There will be lots more designs to come, as I begin sampling what we will weave in the workshop. Thanks for reading, and see you in Reno!


Monday, November 20, 2017

Designing with Echo: An Advancing Point Twill Makes It Easy


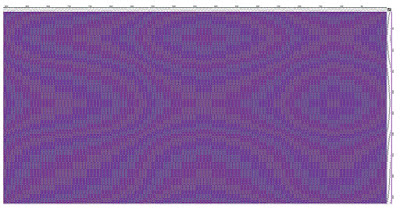
Pictured above: a drawdown for Echo on 8 shafts. While the design appears to have four colors, there are just two colors in the warp and one in the weft. The design is based on a draft of mine that I call "Fun House" because the swirls and swoops remind me of images in a fun-house mirror.

How do you design something like this? Let's start at the very beginning -- which, with computer drafting, means a design line. Here's the one I started with.
Simple enough, right? Concave and convex curves and then curving lines. Based on this, I created an advancing point twill threading, substituting a point-twill block of four or five ends for each square on the design line. Here's what that looked like when finished.

If you look at the first square in the upper-right-hand corner of the design line, this corresponds to the first five ends of the point-twill in the threading (threaded on shafts 8, 7, 6, 5, and 6). The second square in the upper-right-hand corner of the design line becomes the next five ends on the threading (shafts 7, 6, 5, 4, and 5). So every square in the design line represents a block of point twill threading.

Next, I created a parallel threading, so that I could weave Echo. (A parallel threading on eight shafts usually means that every thread in the original single threading will now have a parallel thread -- usually 4 ends above it.) Here's what the advancing point twill threading above looks like.


You see the parallel lines? That's part of the technique known as Echo. And here's what the entire draft looks like when woven using the pattern of the original point-twill threading, with a twill tie-up of 1, 1, 1, 1, 2, 2.

There is a long threading pattern, which is hard to see, so here's a detail.


I like it -- and you may too, if you're still reading this! How did I create a parallel threading so that there are now two lines of point twill? This is easily done on Fiberworks by going to the drop-down menu under "Warp," clicking "Parallel Repeat," and then clicking "Extended Parallel," shafts shift by 4, and "Apply."

The original point-twill draft looks great on its own, tromp as writ. So why go to all this computer-drafting trouble? 

If you're interested in learning more about Echo threading and color interaction, Marian Stubenitsky's book, Weaving with Echo and Iris, is an invaluable resource. Many of her designs use four parallel threadings in four different colors to achieve what she calls "iridescence." (Add the additional color of the weft and the results are truly beautiful.) Although my design uses just two colors in the warp and one in the weft, the result is a four-color fabric -- and it's just a one-shuttle weave!


Echo and extended parallel threadings are the subject of my 2 1/2-day workshop at Convergence 2018 in Reno. The official title is "One Warp, Many Structures: An Exploration of Extended Parallel Threadings." The workshop begins on July 10.

Here's another variation of this drawdown, just to pique your interest.
And here is the same draft, this time treadled as Jin (aka Turned Taqueté).

If you've read this far, you need to sign up for the workshop ;o) General registration begins December 6. Thanks for reading.


Thursday, November 2, 2017

Weavers' Guild of Rochester Holiday Sale Starts Tomorrow!


This hand-dyed cotton dress (pattern courtesy of Marcy Tilton) is just one of the items I will have for sale at the Weavers' Guild of Rochester Holiday Sale -- starting tomorrow, Friday, November 3. There will be hundreds of one-of-a-kind items created by our talented group of 170 weavers and fiber artists. The results are truly awesome and it's the biggest fundraiser of the year for our guild.

Come by and come buy! Free parking, free admission. Buy local, buy handmade and avoid the crowds. Below are all the details.

Oh and by the way -- the dress DOES have pockets ;o)


Name Drafts Aren't Just for Overshot....

  Above is a name draft using -- why not? -- the name Michelangelo, employing an Echo threading and a twill tieup and treading. A name draft...