Showing posts with label differential shrinkage. Show all posts

Saturday, October 25, 2025

Creating an Optical Illusion in Block Double Weave


Please note that, unbeknownst to me as I worked on weaving this image, it is, in fact, an ancient, sacred pattern from the Itneg people of the Philippines. Here are the words of a reader who pointed this out:

"This is an optical art pattern from my culture which originates from the Itneg indigenous people's group in the Philippines. Its dizzying pattern is said to scare away malevolent spirits, so this is a heritage motif in my culture."

And in a second comment, the writer states, "...(T)his particular motif is a sacred pattern that means something spiritually. Other people brought it to other parts of the world through colonization. As weavers, I think it's important to honor the original stewards of that material culture. It's not just weaving or weaving patterns. It's so much more."

So, with that reflection and understanding, I hope that bringing this image to the loom is a respectful act. To be truthful, for me, this did not come from any source that I recall other than the idea that weaving blocks can create optical illusions. At that point I saw that I had re-created a pattern familiar to weavers. Now that I know its history, I share this ancient illusion with a deeper understanding of the reverence felt by the people who created it. 

Below is my original post.
________________________________________________________

Perhaps it's because our brains just want to see patterns -- but do you see expanding circles in this drawdown?

But it's all squares, right? What's going on?

This is known as a "fiction illusion," in which the brain perceives a shape or figure that is not actually present in the image. Optical illusions involve different ways in which the brain and the eye process visual information, such that the perception is different from the reality. 

Why does this happen? Quoting from my Google search: "Your brain uses patterns, past experiences, and context to make sense of visual input, but illusions exploit these processes by presenting confusing or conflicting information, causing the brain to 'fill in the gaps' in a way that leads to a perception that doesn't match reality." 

Aha! Confusing or conflicting information, differences between perception and reality -- this is where weaving can createsome interesting patterns!


Our immediate perception of this black-and-white version of the pattern above: It's full of flowing lines that intersect, dilate, and compress.

But, in the weaving pattern, it's all black-and-white rectangles, increasing and decreasing in length and width. In weaver-speak, it's just double-weave blocks.

I'm in the process of dressing my loom with this design, which is simple block double weave on 8 shafts. Here's the threading:


Two blocks, that's it. But, if you look at the top of the threading, you'll see that the units of 1, 2, 3, and 4 descend from 9 to 8 to 7, etc., in number, all the way down to 3 -- and then they begin to expand again. This means that the widths of the two different warp blocks get progressively smaller, and then they reverse and get larger again.

The treadling is "tromp as writ," meaning that it's identical to the threading. ("Treadle as written" is my rough translation.)


Looking at the weft, you'll see the same progressive increases and decreases in the number of units per block -- from 9 units in the first block to 8 in the second to 7 in the third and so on down to 3, where the number of units begins to increase again. This means that the height of the blocks changes, getting progressively longer and then progressively shorter.

The beauty of double weave is you get solid colors: In the case of my drawdown at the top of this post, green weaves with green, in alternating blocks that are either on the top layer or the bottom layer. And red is doing the reverse. Double weave makes for bold colors and graphic patterns, which is probably why weavers like it so much.

Here's the tieup. It's a double-weave tieup, so that the first 4 shafts on the first treadle lift just shaft 3, while the second 4 shafts weave the bottom layer, which is being woven upside down. This means that, effectively, shaft 7, which is technically down, is the only shaft lifted on the upside-down bottom layer. Then, on treadle 2, the layers exchange, so that shaft 8 is lifting the warp on the top layer while shaft 2 is "lifted" on the upside-down bottom layer. You're exchanging the top layer and the bottom layer to form differing rectangles. And effectively you're weaving plain weave on both layers. (Caveat: I don't consider myself a double-weave expert, so I simply created a tieup that works for me.)

The structure itself gives you two layers of cloth that exchange (top to bottom) in the pattern we talked about, squares that 
increase and decrease in height and width. In my case, I'm threading everything in beige -- but one layer is 20/2 wool and 
the other layer is 17/2 nm silk noil. Using differential-shrinkage techniques (where the wool fulls and draws in 
and the silk noil buckles and puckers because it's being drawn in by the wool), I hope to end up with a fabric that has a 
really interesting texture. But I haven't finished threading yet ;o) because I had to re-thread to get the pattern just right....

(Please note that yes, this is an unusual double-weave tieup. A friend pointed this out and, to be honest, 
I created it because that's how I puzzled it out. I hope to fix the tieup in the next few days....)


And my loom's acting up, but that's another story. Fingers crossed. 

Thanks for reading!


Sunday, June 22, 2025

A Tale of Three Looms


They're all dressed up (well, almost) but not ready to go! Pictured above: At top, my 16-shaft Toika Eeva, threaded for a differential-shrinkage pattern in double weave; in the middle, my 16-shaft Germaine table loom threaded with gossamer-weight silk still in the gum (which I wrote about at length in my previous post); and on the bottom, my 32-shaft Louet Megado only partially threaded (I have to thread the second back beam) for an 8-shaft differential-shrinkage pattern.

So why are they all sitting idle? Well, as you know, weaving is hard because there's lots of preparation. And sometimes you don't even know how much preparation it takes until you're in the thick of dressing your loom. (And sometimes you change your mind -- halfway through dressing your loom -- about which pattern you're going to weave. Does anyone else do this?)

Some details about what's on these three looms...

On the Toika compu-dobby (first photo), I have an 8-shaft double-weave pattern threaded and ready to weave. The only problem is that two shafts were rising when they shouldn't, so I couldn't get the proper sheds for my design. I sent a quick email to Claudia Spaulding (thanks, Claudia!), who is CFO of the Hartford Artisans Weaving Center and happens to be a Toika rep -- and also happens to be a physician. I thought the problem was humidity but her diagnosis was that the posts inside the box on top of the loom had to be adjusted. She also cc'd Bran Gardner in on her reply, the weaving manager for Webs and the chief U.S. support for Toika. Bran has put together very detailed instructions on how to adjust the posts so that the magnets assigned to each shaft are connecting properly.... My electrical-engineering in-house consultant (and husband) did the rest. He's a weaving angel, really.

The pattern uses two layers -- one layer being a yarn that is active and one being a yarn that is inactive. (The red layer is on top and the black layer is on the bottom, while the long black rectangles represent where the two layers weave together in a tied double weave.) After fulling, the active yarn draws in and causes the inactive yarn to buckle, with the tied double weave giving the fabric some stability. Here is the drawdown.


It's threaded as a double-two-tie-unit weave, which can be tied up and treadled to create a range of designs, including double weave. I learned the technique in a workshop I took with Ann Richards in London in 2014, based on her book, Weaving Textiles That Shape Themselves. The two warps are 18/2 superfine merino from Jaggerspun (no longer in business but still available from Jane Stafford Textiles) and 20/2 Mora yarn (which, unlike the 18/2 merino, doesn't full), a Swedish yarn available from Vävstuga

The two wefts are 20/2 Mora (in red, below) and a black wool overtwisted yarn, 52/2 nm Z-twist, from the Handweavers Studio and Gallery in London, an excellent source for energized yarns.


Here's an idea of how the design should look after finishing -- although the sample in this photo differs somewhat, using 30/2 silk and 52/2 nm Z-twist wool in both warp and weft.


So, for all intents and purposes, the Toika is dressed and ready to weave!

On to the Germaine: ah, the Germaine. It's a Purrington copy, really. And this particular iteration was pretty badly made. I'm just saying it straight. But the latest generation of Purrington Looms is very well made, back up to the traditional Purrington standards, by the Bannerman family in West Virginia. I bought the Germaine because it has 16 shafts and, at the time, our guild had a very skilled "loom doctor" who fixed it all up so it works well for me.

What's the warp on that loom? Undegummed silk, very fine, that I will also use as weft to weave a 16-shaft twill pattern with added threads for tying the fabric up warp-wise in order to create a shibori resist. My thinking is that, if I de-gum the silk when the fabric is tied up in a tight shibori "package," I should get some really interesting horizontal pleats in the cloth. I will report back on this experiment.... Here's the pattern. (The red threads in both warp and weft represent potential positioning of threads for shibori ties.)


Lastly, what's on the Megado? Only half a warp, again using 20/2 Mora. The second warp, going on my second warp beam, will be a silk noil purchased from a now-defunct mill in England many years ago. I plan on weaving the piece all in beige to emphasize the texture, using differential-shrinkage techniques.

Trouble is, because the yarns are so fine, calling for a sett of 60 epi (or something close to that) -- predictably, I didn't have enough heddles. It took me two orders from Jane Stafford Textiles to get it right!


Did you know that, when you purchase Texsolv heddles, those four little blue twist-ties on every bunch of 50 heddles allow you to place the loops directly onto the shaft bars? They're tied completely in order, so once you've got them on the shaft bars, you simply undo the twist ties and you're good to go. (I must say, with great humility, that it took me a while to figure this out.)

My second challenge with this loom has to do with my second warp of silk noil. It's typically not used as warp because it breaks easily (silk noil being made of the waste products from producing all the other kinds of silk yarn). I sprayed it with spray starch to make it stiffer, which should help avoid breakage.


Above, my warp chain of silk noil after it's been sprayed with starch and dried. 

That's my story of three looms, just one of them ready to go. Hopefully you'll see photos and read updates in upcoming posts. (I'm keeping my fingers crossed....) Until then, may the weaving goddesses be with you -- and me!

Thanks for reading.


Wednesday, June 14, 2023

It's Conference Season!


I write this as I'm sitting in the airport in Grand Rapids, MI, waiting for a much-delayed flight to Detroit and then home. What better time to post about the just-finished Michigan Handweavers Conference in Holland, MI? And why not start with a classic conference photo -- that of a group of weaver-friends going out to dinner after a long day in the classroom?

Pictured above, from left to right: Cathy McCarthy, Janney Simpson, Martha Town, Susan Moran, Nancy Riele, Martina Celerin, Nadine Cloutier, and me. Everyone in the photo is either a teacher, a conference organizer, a student at the conference, or any combination of the three. You can imagine what we talked about -- for instance, the exhibits....


There are some 19 guilds in Michigan, and one exhibit featured collected works from many of these guilds -- including this beautiful series of blue vertical panels created by members of Woodland Weavers. Whether they were woven, knitted, felted, printed, quilted, or hand-dyed, these vertical panels all related to the exhibit's focus on the lakes and landscape of Michigan. Here's a closeup of one of the pieces, which included cyanotype prints and painted images of white-pine needles. (I apologize for not crediting the artist, as I did not take down the name.)


Here's an image from a rug-hooked piece by Nadine Cloutier, using hand-dyed wool strips to create a sun-soaked lake view. I love the tactile quality and the varying directions of the wool strips.


Martina Celerin was the keynote speaker, who spoke about her dimensional weavings. They all begin with a simple frame loom she builds herself for warping and weaving tapestry-like backdrops of natural scenes. She then uses a number of techniques, including felting and weaving, to extend her pieces beyond the plane of the the loom outward as much as 12 inches. It's difficult for a photo to portray the depth of her creations, but here is an image of one of her recent pieces, featuring a trail meandering through the forest. (The bright blue color in the upper righthand side of the image is from paper bags in the background, unfortunately, that you can see through the open yarns on the loom.)


You can find out more about Celerin by clicking here.

So much to see -- and touch! Speaking of touch, the workshop I taught was based on my book, Weaving Outside the Box: 12 Projects for Creating Dimensional Cloth. To my surprise and delight, people in the workshop took off with their versions of the projects in the book -- in some cases, improving upon them, in my view. 

This sample by Nancy Riele, using the ancient weave technique known as Rippenköper, had whimsical, flowing horizontal lines. It's woven in 8/2 Tencel on a warp of 60/2 silk in a turned-twill design. I consider her sample way better than the piece I wove for the book ;o)


Among the takeaways from this workshop is that textured weaves call for either specialized (energized) yarns, fulling and differential shrinkage, and/or structure -- any one of these or varied combinations of the three. Finishing is key. Below is a photo of the work of Cory Zann, showing the difference between her fabric on the loom and after washing. Again, this is a turned-twill structure on a 60/2 warp, in her case using a silk/stainless-steel yarn for the weft.
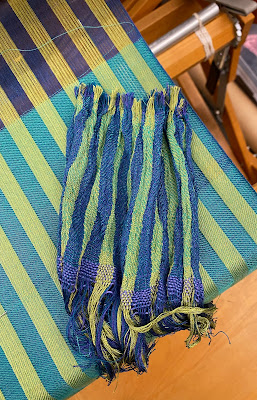

Cindy Root, president of the Michigan League of Handweavers, chose to weave a 4-shaft project on a gradient warp of 16/2 bamboo, using a weft of 18/2 Jagger Spun merino and a supplemental weft of embroidery cotton. The supplemental weft is used to draw the fabric in horizontally, compressing it so that only portions of the wool are exposed in finishing. This means that only some portions of the wool will full, creating pleats where the weft yarns have shrunk and gathered the warp yarns together densely. Here's Cindy's shibori-tightened fabric before it's washed with warm water and agitated with soap. After it's dried a bit, but still damp, she will remove the shibori ties and have a permanently pleated scarf.
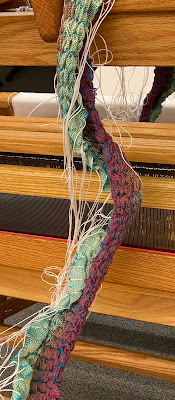

Gail Pilgrim was also working on the Rippenköper structure -- but weaving it in on a 20/2 cotton warp using 8/2 cotton in the weft. She's doing research for a story planned for Heddlecraft magazine looking at hand towels in a variety of structures. In addition to working with cotton wefts, she decided to try a weft of 18/2 Jagger Spun merino, just to see whether the results were worthy of weaving a scarf somewhere down the line (or down the warp). Here's that sample, below.
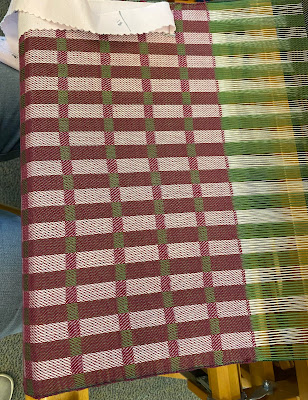

As it is with many workshops, not every project is complete at the end. And since this workshop emphasized the importance of using specific finishing techniques, some weavers chose to finish their projects at home, after the workshop -- as with this 4-shaft deflected doubleweave scarf by Naomi Fletcher, woven with 10/2 cotton in the warp and weft, with a mid-section that includes Colcolastic yarn by Venne, drawing the mid-section in dramatically. I'm hoping she'll send me some photos of her results that I can then share with the group.


Some samples were finished, however (finished meaning washed with warm water and soap and then rinsed), as with this sample below by Martha Town. She wove it on a hand-painted warp of 60/2 silk with navy stripes and jewel-tone-painted stripes and a weft of 120/2 silk, using a turned-twill structure that pleats naturally. Note the subtle yellow accents in the weft every few inches, which add interest to the sample.


Thanks to MLH for a wonderful conference -- and to everyone in my workshop for an experience that I didn't want to end! And finally, thanks to you for reading.


Friday, January 6, 2023

Book Launch!

Weaving Outside the Box: 12 Projects for Creating Dimensional Cloth is now available for purchase! It's been a long road but at last it's ready to launch.

Front and back covers (right and left respectively) for printing

The book is 122 pages long, in full color, with a soft cover and a coil binding so that you can lay it flat as you read and weave. It's also available as an eBook and in hardcover. You'll find all these options on this blog site under the page titled "Publications for Purchase".

Here's a brief description:

"Color and structure are key elements in weaving, of course. But we often overlook the importance of texture. Dimensional fabrics, with their pleats, puffs, and curves, take us 'off the grid', reflecting the organic forms of nature. We can both see and feel the tactile quality of dimensional cloth, which adds much to the beauty of handwoven fabric.

"This book gives you tools to optimize texture in your weaving. Starting with background on the techniques involved, it then offers step-by-step instructions for 12 projects for four to 16-shaft looms: four for beginning weavers, four for intermediate weavers, and four for advanced weavers. As a bonus, there are two patterns that allow you to weave three different projects on a single warp.

"Weaving Outside the Box provides the tips and resources you need to move beyond the two-dimensional plane and rectilinear patterns of warp and weft."

Here are a few of the projects offered.

Among the four projects for four shafts: woven shibori using fulling techniques


Doubleweave layers and ruffles for eight shafts 
using differential-shrinkage techniques


Deflected doubleweave on 16 shafts 
using differential-shrinkage techniques

There are diagrams and even microscopic photos of yarn throughout the book, to help you understand the mechanics behind these designs, all using some combination of active and inactive yarns, structure, and finishing.


I will teach a workshop straight from the book June 11-16 at the Michigan League of Handweavers Conference in Holland, MI. Participants will choose one of the 12 projects from the book and start by weaving up samples so they can learn how to finish their projects to get just the right textured effects.

Dimensional cloth is a specialized area of weaving, one that is sometimes overlooked but has been woven for centuries. My book begins -- and this blog post concludes -- with this quote from Anni Albers, from her definitive book, On Weaving

All progress, it seems, is coupled to regression elsewhere. We have advanced in general, for instance, in regard to verbal articulation -- the reading and writing public of today is enormous. But we certainly have grown increasingly insensitive in our perception by touch, the tactile sense.

I hope my book inspires weavers to explore all three of the wonderful tools we have in our craft: those of structure, color, and the tactile sense.

Thanks for reading!


Detail of Echo threading in four-color doubleweave on 28 shafts, 
using cotton/stainless-steel yarn for one of the wefts 
to achieve crinkled layers


Tuesday, May 18, 2021

Vive la Différence -- with Differential Shrinkage


Top photo: handwoven cloth in loom state

Bottom photo: detail of cloth after finishing

"Loom state" describes fabric that has not yet been finished or dyed. In the textile industry, such fabric is also called "gray" or "griege." 

The finishing process is particularly important to weavers because, as I like to say, "It ain't over till it's finished" (with a nod to Yogi Berra). Woven fabric isn't ready to use until it's properly washed. Unfinished or unwashed, it will retain some of the tension that it was under during the weaving process and thus won't feel or behave optimally.

Differential shrinkage takes the process one step further, creating a puckered or pleated fabric, using warm water, gentle soap and lots of agitation by hand or machine. With this technique, one block or group of yarns (such as the turquoise 18/2 merino in the photos above) will full and shrink while the other (the 10/2 cotton in gold) doesn't, creating lots of texture and visual interest.

Deflected Double Weave works well for differential shrinkage because of the plentiful floats and open spaces that alternate with blocks of plain weave. By definition, it has two layers that weave in and out of each other (but never on top of each other, hence the term "deflected").

When I posted some photos on Facebook -- after fulling to create differential shrinkage -- one weaver thought the fabric was stitched double weave. I explained that it only appeared that way because the layers of wool fuse together and the cotton relaxes, losing the gaps between blocks and appearing as if it were one layer.

Here's what the back of the fabric looks like before finishing -- that is, in loom state. (My apologies for the fuzzy image, but I was using my iPhone in reverse to photograph the underside of the fabric while it was on the loom.)


And here's what it looks like after finishing. The cotton blocks in plain weave look almost like they are one layer -- while, before finishing, there are vertical gaps in between the blocks (where the wool blocks are weaving on the other side).


Here are sections of the drawdowns (front and back respectively), which give you a better idea of how the blocks of wool (in blue) might fuse together in the finishing process, making the blocks of cotton (in gold) appear as a single layer. (The technical term here is "fulling" rather than "felting," because we are fusing yarn rather than raw fiber.)


I know there's probably some vibration between the colors in the drawdowns, because they are close to being complementaries -- which is what I wanted! I love the energy of combining opposites or near-opposites on the color wheel.

I proceeded to weave up a number of samples before I cut off the fabric and washed it -- so here are a couple of "before washing" and "after washing" photos.


Back of fabric before washing


Back of fabric (now upside down) after washing

My son, who took both photos -- thank you, Jake -- thought that it looked better BEFORE there was any differential shrinkage. I can see his point, where the fabric may look tidier and more elegant before fulling. After fulling, it might appear to some as messy and wrinkled.

But I like it that way! Differential shrinkage just appeals to me. And there's more to come, as I have maybe 3 yards left on the loom, keeping in mind that 3 yards will shrink down some.... I'm hoping to weave a scarf using these two patterns in sequence.


Thanks for reading!


Friday, May 15, 2020

Waves of Color: Double Weave with Echo Threadings


"Knit on with confidence and hope through all crises."
Elizabeth Zimmerman

As usual, Elizabeth Zimmerman nailed it: Substitute "weave" for "knit" and that's some of the best advice I can think of in these troubled times. 

So let's look at one of the most beautiful techniques weavers have been focusing on lately (at least judging from Facebook and Instagram and texts I've gotten from friends).

There's this gorgeous piece, from my fellow upstate New Yorker, Amy Parker (first photo shows side one, second photo shows side two):


This is an 8-shaft double-weave fabric woven on 32 treadles with a variety of warp and weft yarns, according to Amy, all around the grist of 10/2 cotton. Each vertical section has 2 colors in the warp and 2 in the weft, so the back side of the piece looks different from the front.

The draft is by Marian Stubenitsky, who generously shared it here on handweaving.net. (It looks a little dark in this reproduction, but hopefully you get the idea.)


Here are some 32-shaft samples by Susan Weigel Balascio, posted recently on Instagram. The samples, using fine threads in the warp, are wonderful. One half of her warp was black merino and pale yellow and the other half was 20/2 Tencel in blues and purples. In the first sample below, she alternated purple merino and a thin red/gold film for her weft yarns. For the second sample, her weft yarns were 38-gauge copper doubled and a 3-ply green silk.


While photos are great for observing color and form, there is no substitute for the sense of touch, to know the hand of a fabric. Susan says the samples are light and lofty, which is ideal for collapse fabrics. Thank you, Susan! 

As for me, sheltering in place with my husband and my looms, I've been weaving up lots of samples with 4-color warps, in preparation for workshops I hope to begin teaching online. The photos below show both the front and back sides.


The thing I like about this last sample is the texture, produced by using 18/2 merino for one of the wefts. The technique is known as differential shrinkage, where one fiber shrinks (the wool) while the other does not (cotton), creating pleats and puckers in the fabric. (Specifically, the double-weave structure divides into two layers in some sections and interlaces in others. Where the layers split, the layer with the wool weft will full and shrink with agitation in hot water and soap, drawing in the cotton layer so that it crinkles and collapses.)

Here are a few more samples, these in just two warp colors, showing how differential-shrinkage techniques will make the fabric collapse -- but again, only where the two layers aren't interlaced.


There are many ways to achieve collapse effects with double weave, but they all require a sett and beat that are more open than normal. So, for instance, if you're working with 10/2 cotton in the warp, you would normally weave this in double weave at a sett of 48 epi (24 epi for plain weave x 2 layers = 48 epi). In the case of all the dimensional samples above, my sett is 36 epi. And I'm thinking it could have been even more open. 

Further, collapse techniques work best with finer yarns, so a 20/2 cotton warp would produce a lighter, softer hand in the fabric. 10/2 cotton in double weave creates a sturdy, less flexible fabric, although it would work well for a jacket.

One last note: Designing these structures isn't easy -- and sampling them doesn't always produce success, at least in my experience. Understanding that nearly all Echo-based double-weave patterns are interlaced double weave, you really have to know that there are large-enough parts of your design where the two layers are weaving separately. 

Remember that double-weave sample in the photo at the beginning of this post? I was SO EXCITED about taking it off the loom and scrubbing it up to produce a collapse fabric. Which didn't really happen...


Yes, that was the result. I suspect that there were really no spaces in the structure where the two layers did not interlace. My bad. I liked the sample better before washing! Which brings me to another quote from Elizabeth Zimmerman:

"Now, let us all take a deep breath and forge on into the future, knitting at the ready."

Knitting, weaving, whatever you choose, forge on! Thanks for reading.