Showing posts with label JaggerSpun 18/2 merino. Show all posts

Sunday, April 28, 2024

Notes from CNCH, the Conference of Northern California Handweavers


Let's start with the photo above: a series of samples woven on eight shafts in deflected doubleweave by Marta Shannon. It's just one picture of dozens of interesting, colorful, and always original samples created by weavers in my workshop this past weekend: "Deflected Doubleweave for Collapse Fabrics."

The goal of my workshop was twofold: 1) to teach weavers to recognize and even design deflected doubleweave patterns and 2) to push the already tactile, off-the-grid quality of DDW by using "energized" yarns such as Colcolastic, metallic gimp, wool-stainless steel, silk-stainless steel, overtwisted linen singles in S and Z twist, overtwisted wool singles in S and Z twist, and, of course, the ever-reliable Jaggerspun 18/2 superfine merino, which fulls beautifully when you give it some wiggle room in the cloth. (Bottom line: plain weave resists fulling and other collapse techniques, because it's the most stable, firm structure of all, while DDW encourages pleating, poufing, and billowing of your fabric because it has warp and weft floats built in, by design,)

That's a lot of words, so here are some photos to give you a better idea of what we were working on.

Some four-shaft samples woven with wefts of both active and inactive yarns. Weaver Rusti Icenogle points to the bottom sample, which pleats vertically because the rose-colored weft is wool/stainless-steel yarn, which fulls and draws the fabric in after it's washed and agitated with hot water and soap.

You know that famous quote, I think it's from Laura Fry, "It ain't finished until it's finished"? We spent a lot of time at the sinks in the ladies' room scrubbing away at our samples, using regular hand soap....

Above, a series of samples woven by Autumn Barr, who was weaving on her brand new eight-shaft loom for the first time. Her warp was 10/2 cotton (brown) and 18/2 merino (white) and she alternated these two yarns as weft also. It's hard to see in this photo, but the sample at the bottom shows lots of horizontal pleats in the brown stripes, which are drawn in as the white wool fulls in the washing.

This sample belongs to Denise Lee, who wove an eight-shaft pattern I call Mardi Gras. For this sample, she alternated green Colcolastic and 10/2 cotton in the weft. The Colcolastic yarn, brand name Venne, has a 20/2 cotton strand combined with a strand of elastic, which shrinks up immediately when washed.

These samples are woven on eight shafts by Colleen Harvey-Arrison. The larger blocks in teal are 18/2 merino, which fulls and draws in the magenta cotton blocks, adding texture and making them curve and flow over the fabric.

The CNCH conference, affectionately known as "Cinch," is held every year in a different area of northern California. It's well worth attending, with exhibits, vendors (including Lunatic Fringe Yarns, Dharma Trading, and Eugene Textile Center), a keynote speech (this year by tapestry artist Susan Iverson), terrific meals, and lots of friendly fiber artists.

Take Sara Lamb, for instance, who is a well-known author, teacher, spinner, dyer, and weaver.


Sara wears a jacket she wove and sewed, of course! Plus the yarns are handspun silk that she dyed, all plain weave in structure -- showing off those yarns to the maximum.


The cloth is warp-emphasis (and is displayed horizontally in this photo).

I got to rub shoulders with other weaving royalty as well: seen below, Ana Lisa Hedstrom and Peggy Osterkamp. I had dinner with Peggy -- during which at least two weavers came up to our table to thank her for her many books that helped them build their weaving skills.


I fell in love with this tapestry on exhibit, shown below, titled "Pandemic Oasis" and woven by Nancy Isaac of the Loom and Shuttle Guild in San Francisco.


I also fell in love with this tatted piece, a work in progress by Nancy Alegria, in which she is recording the temperature and the sunlight (encoded in colors) of every day in 2024.


Even after the conference, I'm still taking it all in. Lots of learning, too many purchases (I won't list them, but there was yarn involved), and great camaraderie. 

Here's to next year!


Thursday, February 10, 2022

Collapse Techniques: Some Active Yarns and How They Work


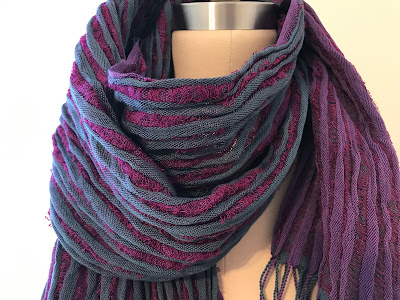
Pictured above: A scarf woven on 4 shafts in deflected double weave. The warp is 20/2 cotton in stripes of teal and purple and the weft uses these yarns plus a wool/stainless-steel yarn (see the floats above, in fuchsia). The scarf looks like gauze on the loom, but when you wash it in gentle soap and lukewarm water, the wool/stainless floats crinkle up and draw in horizontally, creating vertical pleats in the fabric.

I love these surprises in the finishing! And one of the easiest ways to achieve them is by using active or energized or exotic yarns -- a large category that includes yarns that will shrink, twist, collapse, and/or relax after washing.

Right now I'm teaching a Zoom workshop for the Reno Fiber Guild, "Deflected Double Weave for Collapse Fabrics." I put together a short handout on the active yarns we're using and how they work and I thought it was worth sharing in a blog post. Here's the list -- of course, it's not comprehensive -- along with photos and images of the yarns under magnification.

Fine Gold Gimp (Metallic Yarn)


The thicker version of this yarn doesn't work well for creating texture in fabrics, but the finer version can add a lot of interest. It's really 77% polypropylene and 23% metallic. And it's hard to find: The only vendor in the States that sells it is Made in America Yarns, a Philadelphia company that lists it under the name "fine metallic gimp yarn."

This is what a single strand looks like at 60X magnification.

And here's what it looks like after weaving and washing.


The polypropylene shrinks up with warm water and soap, bending and crimping the metallic coils around it. When used as weft, this can create some interesting motifs as it shrinks the fabric width-wise.


Wool/Stainless-Steel Yarn


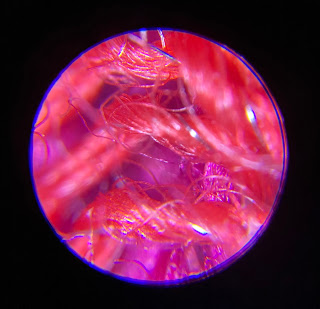
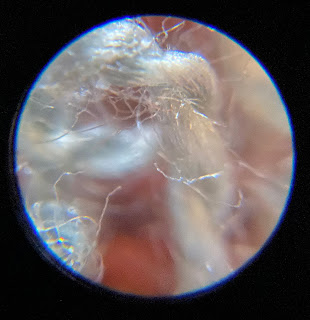
This yarn, available from Habu Textiles, is what I used as weft in the scarf pictured at the beginning of my post. You can achieve similar effects with silk/stainless-steel yarn, available from Lunatic Fringe. Here's what it looks like under 60X magnification, unwoven (first photo) and woven and washed (second photo).


The wool shrinks in the washing and the stainless-steel filament bends with it, so that the sample is drawn in. I find that you can actually shape the garment, either flattening it out or stretching it vertically to create vertical pleats. It all depends on your mood ;o)


Deflected double weave sample on 8 shafts


Deflected double weave sample on 12 shafts

18/2 Merino Wool

Nothing beats wool for differential-shrinkage effects. Combine it with cotton or silk or some other inactive yarn and you'll get pleats and poufs and lots of texture. (Note: I don't recommend using JaggerSpun Zephyr, because the silk component doesn't full in comparison with the 18/2 superfine merino. Also, be careful not to purchase super-wash wool yarn, because these yarns are chemically treated NOT to full or shrink.)

Hand-painted warp of 18/2 JaggerSpun superfine merino


1 strand of 2-ply yarn, before fulling


Magnified image of the yarn after weaving and fulling


16-shaft deflected double weave sample after fulling, using 18/2 merino and 10/2 cotton in both warp and weft (hand-painted warps and wefts)

Venne Colcolastic (and Other Elasticized Yarns)


This yarn has two components: a fine 2-ply mercerized cotton and an elasticized single. Here's what it looks like under magnification:


And here's what it looks like under magnification and after weaving and washing:


My explanation for this effect is that the elastic draws in and the cotton is drawn in with it, crinkling and twisting up as it goes. Below is a sample of a 4-shaft deflected-double-weave piece I wove with long weft floats of the Colcolastic. (You're viewing the warp horizontally.)


This second sample, below, has no floats on the front and narrow floats on the back, simply because there are just 4 warp yarns in the block it floats over. It's a 12-shaft deflected double weave. Colcolastic is used as weft for the middle section only.


Active yarns are just one way to create textured fabrics. You can also achieve dimensional effects just by weaving structures that lend themselves to texture: turned twills, honeycomb, waffle weave, and of course deflected double weave will create curves and pleats even without the aid of active yarns.

Weavers will sometimes get preoccupied with color and structure, forgetting about that third invaluable characteristic of our craft, that of texture. In her definitive book, On Weaving, Anni Albers devotes a chapter to "Tactile Sensibility," focusing on the importance of matière:

"Matière is the word now usually understood to mean the surface appearance of material, such as grain, roughness or smoothness, dullness or gloss, etc., qualities of appearance that can be observed by touch.... Surface quality of material -- that is, matière -- being mainly a quality of appearance, is an aesthetic quality and therefore a medium of the artist...."

Weaving, in her view, brings us back to our ancient tactile sense. Of course, the yarns we use are central to this achievement.

Thanks for reading!


Tuesday, May 18, 2021

Vive la Différence -- with Differential Shrinkage


Top photo: handwoven cloth in loom state

Bottom photo: detail of cloth after finishing

"Loom state" describes fabric that has not yet been finished or dyed. In the textile industry, such fabric is also called "gray" or "griege." 

The finishing process is particularly important to weavers because, as I like to say, "It ain't over till it's finished" (with a nod to Yogi Berra). Woven fabric isn't ready to use until it's properly washed. Unfinished or unwashed, it will retain some of the tension that it was under during the weaving process and thus won't feel or behave optimally.

Differential shrinkage takes the process one step further, creating a puckered or pleated fabric, using warm water, gentle soap and lots of agitation by hand or machine. With this technique, one block or group of yarns (such as the turquoise 18/2 merino in the photos above) will full and shrink while the other (the 10/2 cotton in gold) doesn't, creating lots of texture and visual interest.

Deflected Double Weave works well for differential shrinkage because of the plentiful floats and open spaces that alternate with blocks of plain weave. By definition, it has two layers that weave in and out of each other (but never on top of each other, hence the term "deflected").

When I posted some photos on Facebook -- after fulling to create differential shrinkage -- one weaver thought the fabric was stitched double weave. I explained that it only appeared that way because the layers of wool fuse together and the cotton relaxes, losing the gaps between blocks and appearing as if it were one layer.

Here's what the back of the fabric looks like before finishing -- that is, in loom state. (My apologies for the fuzzy image, but I was using my iPhone in reverse to photograph the underside of the fabric while it was on the loom.)


And here's what it looks like after finishing. The cotton blocks in plain weave look almost like they are one layer -- while, before finishing, there are vertical gaps in between the blocks (where the wool blocks are weaving on the other side).


Here are sections of the drawdowns (front and back respectively), which give you a better idea of how the blocks of wool (in blue) might fuse together in the finishing process, making the blocks of cotton (in gold) appear as a single layer. (The technical term here is "fulling" rather than "felting," because we are fusing yarn rather than raw fiber.)


I know there's probably some vibration between the colors in the drawdowns, because they are close to being complementaries -- which is what I wanted! I love the energy of combining opposites or near-opposites on the color wheel.

I proceeded to weave up a number of samples before I cut off the fabric and washed it -- so here are a couple of "before washing" and "after washing" photos.


Back of fabric before washing


Back of fabric (now upside down) after washing

My son, who took both photos -- thank you, Jake -- thought that it looked better BEFORE there was any differential shrinkage. I can see his point, where the fabric may look tidier and more elegant before fulling. After fulling, it might appear to some as messy and wrinkled.

But I like it that way! Differential shrinkage just appeals to me. And there's more to come, as I have maybe 3 yards left on the loom, keeping in mind that 3 yards will shrink down some.... I'm hoping to weave a scarf using these two patterns in sequence.


Thanks for reading!


Thursday, August 16, 2018

Deflected Double Weave with Fulling Techniques on 4 Shafts: How to Weave a 'Puzzle Scarf'


I call this a "Puzzle Scarf" because the two layers intertwine in a puzzling way. But the scarf is simple to weave, requiring just 4 shafts. 

The intertwining layers you see are one of the distinguishing characteristics of the structure known as "Deflected Double Weave." Unlike Double Weave -- where the layers are each woven (usually in plain weave) and sit one on top of the other -- in Deflected Double Weave, the layers are alternately plain weave and floats, with the floats being "deflected" around the woven sections. And those floats will alternately twine above and below each other, so that the two layers still form a single piece of fabric.

Collapse techniques -- more accurately in this project, fulling techniques -- add more to the puzzle of this scarf, because without shrinking, it would look like a piece of gauze. The texture is achieved by fulling the yarn, so that the floats create woolen cords (I sometimes call them "dreads") that form interesting patterns. I love the effect and I thought I'd share the pattern on my blog -- because it's surprisingly simple.

For so many of my fulling projects, my go-to yarn is JaggerSpun 18/2 merino. Collapse techniques typically require fine yarns, and this is a lace-weight yarn at 5040 yards per pound. When it's sett loosely (another rule for collapse fabrics), the merino fulls beautifully as it's washed and agitated with hot water and soap.

Here are the instructions:

Warp: Wind a 4-yard warp (or any length you choose) of 240 ends consisting of five stripes alternating in two colors: [48 ends of color A and 48 ends of color B] twice and ending with 48 ends of color A. 
Sett: 16 ends per inch for a 15" width in the reed
Weft yarns: same two yarns as warp
Picks per inch: 16 

Here's the drawdown:


Looks pretty simple, right? Here's what it looks like as you begin weaving:


First you'll weave at least 8 picks of waste yarn as a base for your fabric. Then leave a space of about 3" before you begin weaving the scarf. (I inserted a stick shuttle to help me create a straight fell line as I began the scarf.) The waste yarn will be cut off when you have finished fulling the scarf, leaving a neat line of cords for fringe.

Begin by weaving 8 picks in plain weave. Then start layer A (mine is in burgundy), weaving 48 picks at 16 ppi. The fabric looks like gauze on the loom. But the good news is you don't really have to worry about neat selvages, since the fabric will shrink so much it won't make any difference!


Next weave your second layer (mine is in blue). Note that the selvages on both sides of this layer are 3" inside the selvages for the first layer. That's another characteristic of Deflected Double Weave: the layers don't have the same selvages. You can see in the photo below where the blue weft starts and ends. 


I recommend cutting off as you complete each color -- unless you don't mind the unruly weft yarns that you carry along between layers when they're not weaving. If you DO choose not to cut off, understand that the second layer (the blue layer here) has to start with the shuttle UNDERNEATH the burgundy layer. Otherwise, your blue weft yarn will float on top of your fabric when all the others are floating underneath.

Here's the easy part: Just keep weaving, keeping in mind that you will have about 30% shrinkage length-wise after you've fulled your scarf. That means you'll want to weave 100" for a 70" long scarf. 

When you've woven your desired length, finish as you started: weave 8 picks of plain weave in color A, then leave about 3" of warp unwoven, then weave 8 picks of waste yarn. (Again, you'll cut this off after finishing so that you'll have fulled cords for the fringe and they will be all neat and tidy.)

Now for the fulling, which is really the toughest part of making this scarf.

Wash, agitate and scrub freely in hot water and gentle dish liquid or shampoo. After the first 3 or 4 minutes of this, take it out of the water and rinse it in cold water to make sure that no parts are adhering to other parts of the scarf. (Although you want the unwoven warps and wefts to make cords, you don’t want them to fuse with other parts of the scarf, which happens when you're not paying attention.) The scarf will look messy and stringy at first, but continue to scrub, agitate, rinse and then stretch it out on a flat surface, pulling the two plain-weave sections horizontally so that they lie flat. (Basically, you are coaxing the fabric into the shape you want.)

You need to repeat this process for a while -- at least 5 or 6 times -- to get the cords to become substantial. The goal is that these floats fuse together, becoming thick and solid so that you can no longer see the individual threads.

When it's fulled sufficiently, lay the scarf on a flat surface to dry. After it's dry, cut off the waste yarn so that the fringe (which should be cords at this point) is all the same length and looks even. Iron the scarf on "wool" setting to get a smooth look, where the cords and plain-weave sections lie flat.

Snip off any single yarns that have not been fulled into cords.

There you have it! You've solved the Puzzle Scarf.